
Fluid containment is preparation, not a zero-loss shortcut
You can limit brake-fluid loss when disconnecting a caliper hose, but you should not expect a completely dry job or assume the connection can be reopened without bleeding. Fluid is already present at the joint, and opening the hydraulic circuit creates an opportunity for air and contamination to enter. The sensible goal is a controlled disconnection with the correct clean caps, replacement seals, specified fluid and bleeding equipment ready. If those provisions are unavailable, leave the circuit closed until they are. First decide whether the hose actually needs to come off. Many pad and rotor procedures allow the caliper to remain hydraulically connected while it is supported appropriately. Disconnecting a sound hose solely to move the caliper out of the way adds a hydraulic repair step that the job may not need.
A caliper must never hang from its hose, but a proper support can avoid opening the connection. Consult the vehicle's procedure before deciding which parts must be separated. This guide helps you evaluate the plan and recognize unsafe shortcuts. It does not supply universal fitting torque, bleeding order or electronic brake-system isolation steps. Those details depend on the vehicle and brake equipment. Brembo publishes caliper replacement instructions alongside application-specific parts information; use the relevant vehicle workshop instructions for the exact connection and service sequence. If you cannot identify the fitting or safely complete the final hydraulic checks, have a brake technician perform the work.

Credit: www.blingstrom.co
Identify the joint and prepare everything before opening it
The flexible hose at the caliper may terminate in a banjo fitting with a hollow bolt and sealing washers, or in another threaded connection. A rigid pipe-to-hose joint elsewhere on the vehicle is a different connection. The correct wrench, sealing method and replacement parts follow the actual joint, not the phrase brake line. Photograph the routing and connection before disturbing anything, then compare the replacement caliper and service parts against that arrangement. For a banjo connection, the required washers must be the specified dimensions and material, and old washers must not remain stuck against a mating face. Do not stack extra washers to solve a leak or reuse a sealing arrangement that the instructions require replacing. A flare-type connection seals through its designed seat rather than a layer of general thread sealant.
A bolt that threads into the hole is not proof that its length, flow passages or sealing geometry are correct. Parts identification must happen before the old joint is opened. Have clean hydraulic-service caps or plugs intended for the relevant fittings ready at the work area. Their purpose is temporary containment and exclusion of dirt, not to become permanent repairs. A random screw, a piece of cloth or a plug coated with unknown lubricant can damage or contaminate the connection. Keep new seals covered until needed. Place a suitable catch container where the first drops will land and protect nearby surfaces from spills.
Use only the brake fluid specification prescribed for the vehicle, from a suitable clean container. Do not select fluid solely by a familiar brand or assume a higher number is automatically compatible. The reservoir level must be monitored through the service procedure; allowing it to empty can make the repair substantially more involved. Fluid caught from a disconnected line should not be poured back into the system. Its cleanliness is no longer controlled. Vehicle support and brake-system preparation come before the spanner. Use the correct lifting points and rated supports on a firm level surface, secure the vehicle against movement, and follow the manufacturer's precautions for powered or electronically controlled braking.
Some systems can generate pressure or operate pumps in circumstances that are not obvious from the ignition switch alone. Read the required isolation and depressurization procedure rather than assuming that removing a key makes every circuit inert. Check that the necessary bleeding method is available before proceeding. A simple manual procedure is not appropriate for every vehicle or every repair condition. If a scan-tool routine may be required, confirm coverage for that model instead of discovering the limitation after draining the reservoir. This is also the time to decide whether corrosion around the fitting makes a professional repair the better option. A seized or rounded connection can turn a planned caliper swap into a hose or pipe replacement.
Control the loss, restore the connection and verify the repair
- Keep the caliper supported while working on the hose joint. The hose should not carry the weight of the assembly or be twisted to obtain wrench access. Follow the prescribed disconnection sequence using a tool that fits the fastener properly. If the connection resists unexpectedly, stop and assess the condition rather than applying force through the hose.
- Damaging the fitting to save a small amount of fluid defeats the purpose of careful preparation. Contain the initial fluid and fit the appropriate clean temporary cap or plug promptly as the procedure permits. A cap reduces ongoing leakage but cannot undo air entry or contamination that already occurred. Keep the open time short by having the replacement assembly and seals ready.
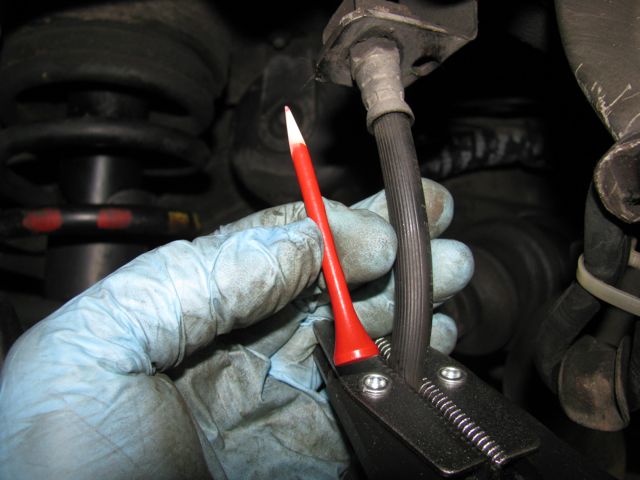
- Do not leave disconnected components on a dirty floor or use the brake pedal while an open circuit is being handled. Any required pedal positioning must come from the vehicle procedure, not an improvised wedge intended to stop dripping. Pinching the hose is not a universal answer. Do not use locking pliers, a sharp-edged clamp or a general workshop vice on a brake hose.
- Even a tool sold as a hose clamp is not authorization to use it on every brake hose construction. Clamp a hose only when the applicable service instructions explicitly permit that method and specify a suitable tool. Otherwise use the approved containment method or have the work performed by a technician. This caution matters because external appearance does not reveal every internal defect.
- Wagner distinguishes hose restriction from internal caliper binding in its brake inspection guidance. That diagnostic guidance is not permission to crush a hose during service. A hose that has been damaged by an improvised clamp should not be treated as satisfactory merely because no fluid appears on its exterior. Tell the repairer what happened so its condition can be assessed correctly.
- Do not try to eliminate every drop by sealing the reservoir with household plastic or another unapproved arrangement. Such tricks can conceal the actual state of the job and introduce material that does not belong in a hydraulic system. Leaving the reservoir cap off indefinitely is not a fluid-control procedure either. Follow the manual's reservoir handling instructions and keep the surrounding area clean.
- The priority is preventing air and dirt from creating a larger fault, not producing a video with no visible drips. Before reconnecting, inspect the hose, mating surfaces and new caliper connection for damage or contamination. Confirm that all temporary plugs have been removed where required. Install the specified new seals and hardware without improvising sealants.
- Start threaded fasteners correctly and use the application-specific tightening procedure and torque. A leak is a reason to inspect the joint, not to keep tightening beyond specification. Route the hose as designed and reinstall its locating features, clips and brackets. Check for twist, stretching, kinks and contact with the wheel, suspension or other moving components over the required range of movement.
- A connection can be fluid-tight while its routing remains unsafe. Compare the finished installation with the original routing record and the service illustration. Neither a photograph nor a quick visual glance replaces checking the actual clearance.
- Bleed the system as specified for the repair and monitor reservoir level throughout. Do not assume that losing only a teaspoon of fluid means bleeding is unnecessary. The size and location of an air pocket are not reliably indicated by the fluid collected in a tray.
- Likewise, a clear stream during one part of a bleed does not prove every circuit is free of air. Complete the prescribed process, including electronic routines when required. Check for leakage using the required stationary pressure test and inspect the repaired connection without placing yourself under an unsupported vehicle.
- Verify a consistent pedal and correct release before any controlled movement. If the pedal remains soft, sinks unexpectedly or a warning stays active, stop the job and investigate. Driving around the block to firm up an uncertain brake pedal is not an acceptable final step.
- Have the vehicle recovered if necessary. Where an integrated parking brake or electronic service mode was involved, finish its specified setup as a separate task. Reconnecting a hydraulic hose does not automatically restore parking-brake adjustment or clear every service condition.
- Confirm that the brake applies and releases as required. For piston and parking-brake distinctions, see retracting a caliper with an integrated parking brake. Do not transfer a procedure from a different caliper simply because the two housings look alike.
- Clean spills using the appropriate method for the affected material and fluid, and dispose of waste according to local rules. Do not let cleanup distract from checking the fluid level and replacing protective caps in their proper positions. Record the fluid specification and the parts installed.
Keeping that information with the invoice or maintenance record makes a later leak or pedal complaint easier to investigate. When comparing workshop estimates, ask whether the price includes new sealing hardware, the necessary bleed procedure and a final leak and function check. A low quote that covers only swapping the housing is not directly comparable to a complete hydraulic repair.
The FTC recommends written repair estimates and clear authorization for additional work. That helps distinguish an unavoidable corroded fitting repair from an unexplained change in scope. The successful outcome is not literally zero fluid lost.
It is a clean, correctly sealed connection with sound hose routing, no leakage, proper pedal response and verified brake operation. A small controlled loss followed by the full required service is preferable to an improvised shortcut that conceals air or hose damage. If any of those checks cannot be completed, the vehicle is not ready to drive regardless of how tidy the disconnection appeared.


Automotive reference information. Confirm specifications in the manual for your exact vehicle. Original replacement guides link to their research sources. About us