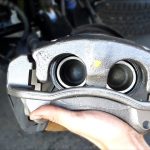
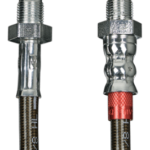
There is no single brake caliper bolt size. First identify whether you mean the guide-pin bolt, the bracket mounting bolt or the hydraulic hose connection, then look up that fastener for the exact vehicle and brake package. A socket that fits the head tells you which tool engages it; it does not tell you the thread diameter, pitch, strength, replacement requirement or tightening torque.
This distinction matters because similar-looking bolts perform different jobs within a safety-critical assembly. This guide helps you build a reliable parts-and-tool list without relying on a generic size chart. It is not a substitute for the vehicle's brake service procedure, and it deliberately avoids presenting a guessed universal torque.
Identify which caliper bolt you mean
-
A floating caliper commonly has fasteners associated with its sliding guides and separate fasteners securing a carrier or bracket to the vehicle. Those connections should not be treated as interchangeable.
- The guide assembly allows the caliper to move as the pads operate, while the bracket connection locates the assembly relative to the disc. A fixed caliper has a different arrangement, so a drawing of a floating design may not describe your hardware.
- The hose may attach through a hollow banjo bolt or another specified hydraulic fitting.
- A bleeder screw is a separate component with a sealing function, even if its external shape resembles a small bolt.
-
Some calipers also have body or bridge bolts that are not intended to be disturbed during ordinary pad replacement.
- Match the location to a labelled service illustration before removing anything.
- A clear photograph helps a parts supplier distinguish the requested item, but the photograph alone cannot establish thread specification.
- If the task is only pad replacement, confirm which fasteners the approved procedure actually requires you to loosen.
Collect vehicle and brake-package information
Start with the VIN, model year, model, axle and the side being serviced. Record the fitted brake package or option code when the manufacturer uses one.
- Vehicles sharing a model name can have different rotor sizes and calipers, including changes during a production year. Previous modifications or replacement assemblies can also make a VIN-only lookup incomplete.
-
Compare the installed caliper's markings and bracket arrangement with the catalogue illustration. Ask the supplier to identify a specific part number and application rather than merely a bolt that looks similar.
- Keep the service instruction and parts listing together so that an instruction for one brake package does not get paired with hardware for another.
- Brembo’s caliper fitting guidance directs installers to verify application suitability and use the vehicle manufacturer's tightening specifications.
- Its procedure covers the caliper arrangements described there; it is not a universal bolt chart for every vehicle.
If the installed hardware differs from the illustration, stop and resolve that mismatch before ordering replacements.
Credit: www.reddit.com
Socket size is not thread size
- A socket size describes the tool's engagement with the bolt head, while thread size describes the threaded shaft. Internal hex, external hex, Torx and other drive forms require the appropriate tool profile as well as the correct nominal size. A tool that nearly fits can damage the head and turn an ordinary service into an extraction problem. Clean enough dirt from the drive recess to seat the tool fully, without contaminating friction surfaces or damaging protective components. Do not infer metric versus inch thread dimensions from the vehicle badge or a rough ruler measurement.
- A replacement fastener may also have a different approved head design while retaining its specified function, so the correct part number remains more reliable than a remembered socket size. If corrosion prevents proper engagement, assess the fastener and access method before applying greater force. A useful way to record the answer is to use separate fields for tool drive, replacement part number and assembly instruction. Leaving any one of those fields blank highlights what is still unknown. For example, finding a correctly fitting hex bit may solve removal access but does not authorize reuse of the bolt afterward.
- Likewise, receiving the correct replacement bolt does not supply the torque procedure automatically. If an online listing shows only dimensions, ask the seller to confirm the intended brake application rather than treating its dimensions as a complete approval. This approach also helps when a vehicle has an aftermarket brake kit: use the kit manufacturer's installation document for kit-specific hardware and resolve any conflict with the vehicle procedure. Keep the document revision and kit identification with the service record, since a generic vehicle search may return the original factory assembly instead.
Read the complete replacement specification
Thread diameter and pitch are only part of the requirement. Length, shoulder geometry, head seating surface, material specification and any locking treatment can matter as well.
A bolt that starts in the hole can still be unsuitable if it bottoms out before clamping the joint or does not engage enough thread. Conversely, a longer bolt may interfere with a moving component even though its pitch matches.
Use the designated service part or an explicitly approved equivalent, with the supplier's application confirmation. Do not replace a missing caliper fastener with general hardware-store stock merely because it screws in.
If the catalogue lists a kit with a guide pin, boot or related hardware, establish which pieces must be replaced together. Save the packaging and part number until installation and verification are complete.
Keep guide-pin hardware in its assigned position
-
Guide pins can differ within one caliper assembly, and their bolts or accompanying rubber components can differ too. Organize parts by wheel, upper position and lower position during disassembly.
- A replacement kit should be compared with the correct service drawing rather than shuffled until something fits. HELLA’s guide-pin explanation describes how impaired movement and damaged protective parts can affect a floating caliper.
- That supports inspecting the whole guide arrangement instead of treating the bolt as an isolated piece.
- It does not establish that every caliper uses the same lubricant or pin orientation.
- Avoid coating bolt threads with guide-pin grease unless the fastener procedure expressly calls for it.
- Lubricating a sliding surface and preparing a threaded joint are separate instructions.
-
If a pin rotates while its bolt is being tightened, use the specified holding method instead of gripping and damaging a sealing or sliding surface.
- Finish by confirming that the assembled guide mechanism moves as intended and its protective boots are seated correctly.
Torque, replacement rules and thread condition
Find the torque instruction for the exact connection, not simply a nearby number under the same brake heading. The procedure may distinguish bracket bolts from slide-pin bolts and may specify additional angle tightening or new hardware.
-
Follow any stated thread preparation, locking compound or replacement requirement exactly. Do not add anti-seize, oil or extra threadlocker by habit, because the intended tightening condition is part of the specification.
- A torque wrench reading does not prove that a damaged thread or an incorrectly seated bolt produced the required joint.
- Inspect accessible threads and mating surfaces before assembly, and investigate binding rather than forcing the fastener.
- If a bolt has already been rounded, stretched, cross-threaded or substituted by a previous repair, correct the underlying hardware problem.
-
TRW’s brake service instructions likewise refer tightening and replacement requirements to the relevant vehicle instructions.
- Record the source of the specification on the job sheet so that another person can verify it.
Do not use a torque figure from an unrelated online example simply because the socket size matches.
Credit: www.reddit.com
When the old bolt is missing or broken
- A missing bolt removes the easiest visual comparison, but it does not justify guessing. Identify the assembly through the vehicle record, installed part markings and a correct exploded diagram. Have the threaded mounting point and surrounding parts assessed if a bolt broke, backed out or damaged its hole.
- Replacing only the bolt may leave an unsafe mounting surface, worn bracket or damaged caliper unresolved. Do not drive with an incomplete or loose caliper attachment to obtain a comparison part. Arrange recovery when the brake assembly cannot be secured and verified correctly.
- A repair facility can establish whether thread repair is permitted for that component or whether replacement is required. Avoid treating improvised washers or a longer bolt as a way to restore a damaged joint.
A practical request to send a parts supplier
State the vehicle details, axle, brake package and exact fastener location in one message. For example, ask for the carrier-to-knuckle mounting fastener for the installed front brake assembly, rather than asking for a brake bolt. Include a photograph showing where the fastener belongs and any readable caliper or bracket markings. Ask whether the supplied item is a single bolt, a matched kit or a fastener with a pre-applied treatment.
Confirm whether the service procedure requires replacement after removal and whether additional hardware is needed. Then obtain the matching tool size from the actual part or reliable service data. This creates a traceable answer to the original size question while keeping tool selection separate from component compatibility. After assembly, complete the prescribed brake checks before returning the vehicle to service; identifying the correct bolt is one part of that process, not the entire repair.


Automotive reference information. Confirm specifications in the manual for your exact vehicle. Original replacement guides link to their research sources. About us