There is no single torque setting for a brake caliper. The correct value belongs to a particular fastener on a particular brake assembly, and it may also depend on whether the fastener is new, how its threads are prepared and whether an additional angle-tightening step is required. Identify the connection first, then obtain its complete tightening instruction from the applicable vehicle or brake-kit service information. Do not choose a number by socket size or by averaging conflicting internet answers.
A caliper mounting bolt, a guide-pin bolt, a bleeder and a hydraulic hose fitting do different jobs. Their specifications are not interchangeable even when they are close together. This guide explains how to find and verify the right instruction and how to avoid common measurement errors. It deliberately supplies no universal torque range that could be mistaken for permission to tighten an unidentified fastener.
If a caliper attachment is loose, missing or damaged, the vehicle should not be driven while you search for a setting. The mounting point and surrounding components need assessment as well as the correct replacement hardware. If you are already in the middle of a repair and cannot establish the applicable specification, pause the assembly and obtain the information before continuing. A guessed setting is not made safer by using a precise torque wrench.
The useful answer to how much torque therefore includes more than a number: it identifies the vehicle, brake package, fastener location, units, preparation and tightening sequence. Once those details agree, the specified number has meaning. Until then, even an authentic specification may belong to a different connection or application.
Why the complete tightening instruction matters
| Torque is the rotational effort applied to a fastener; the joint needs the intended clamping condition after tightening. Thread and seating conditions affect the relationship between those two things. A wrench reaching its setting does not prove that the correct parts are present or that damaged threads have produced a sound attachment. A bolt that bottoms out before seating can give resistance without correctly securing the joint. Likewise, adding lubricant where dry assembly is specified changes the conditions assumed by the instruction. |
This is why a service specification should be read as a procedure rather than a loose number. It may call for clean dry threads, a supplied locking treatment, a particular replacement bolt or another defined preparation. Follow the exact instruction instead of combining pieces from different procedures. Do not add grease, anti-seize or threadlocker simply because it seems helpful. Lubricating a sliding guide surface is a separate operation from preparing its threaded fastener.
Brembo’s caliper fitting instructions refer caliper attachment torque to the vehicle manufacturer. That document also distinguishes different fasteners within the assembly it describes. It does not make every reference table a universal specification for all calipers. When a component supplier and vehicle procedure appear to disagree, check their application scope and revisions, then seek clarification rather than selecting the higher number. Excessive tightening is not extra security.
It can damage the fastener, its threads or the component being clamped. Insufficient tightening can leave a joint improperly secured. Neither risk is resolved by a later paint mark across the bolt head. A witness mark may help document a checked connection in an appropriate workflow, but it does not measure torque or prove the initial assembly was correct.
Angle tightening requires its own attention. Where the procedure gives an initial torque followed by a specified rotation, the second stage must not be omitted or replaced with a guessed final torque. The actual instruction determines the sequence and any reuse restriction. Do not assume every bolt with an angle stage is reusable, or that every replacement rule can be inferred from the fastener’s appearance.
Breakaway torque during removal is also not the installation specification. Corrosion, locking compound, service exposure and the original joint condition can affect the effort needed to loosen a bolt. Recording that effort does not recover a missing assembly instruction. The sound approach is to identify the hardware and find the correct service data, not reverse-engineer a setting from an old repair.
Credit: motofaction.org
Find the exact fastener, application and units
Start with the vehicle identification, model year, axle and fitted brake option. Record whether the brakes are factory equipment or an aftermarket conversion. The same vehicle name can cover different brake packages, and a previous owner may have changed components. Match the installed caliper and bracket to the service illustration. If their appearance or markings conflict with the expected application, resolve that before trusting a torque listing.
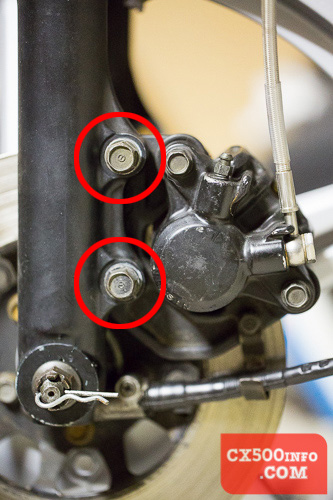
Next, identify the fastener by function. A bracket-to-knuckle bolt is different from a caliper-to-guide connection. A hollow hose bolt and a bleeder have sealing duties and must not receive a mounting-bolt specification. Body or bridge hardware may not be intended for routine service at all. Our caliper bolt identification guide explains the distinction between tool size and the complete replacement specification.
Use current manufacturer workshop information, the fitting document supplied with the exact brake kit, or an appropriate professional service-information source. Read the associated notes and diagrams, not just the table heading. Confirm whether the listed value is for the front or rear and whether it covers a particular production range. TRW’s brake service guidance also directs fastening requirements to the applicable vehicle instructions. A general brake-service leaflet is context; it is not a substitute for identifying the actual joint.
Check the units explicitly. Newton-metres, pound-feet and pound-inches are different units, and confusing the last two can produce a major error. Prefer the specification in the same unit as the calibrated tool when available. If conversion is necessary, use a reliable conversion and preserve the meaning of any range or staged procedure. Do not copy a bare number into a worksheet without its unit.
Record the full instruction before assembly: fastener description, part number if specified, torque or stages, unit, thread preparation, replacement rule and source reference. This small record makes it possible to compare an instruction with the actual parts on the bench. If the instruction says new bolt, obtain that bolt rather than deciding that the old one looks acceptable. If it calls for a specified locking product, follow its application and timing directions as well. When two online values disagree, investigate whether they refer to different fasteners or brake packages.
A forum reply may be correct for its author’s vehicle and wrong for yours. A catalogue listing may provide dimensions without a tightening procedure. A service bulletin may revise an earlier instruction for a defined application. Ask a qualified repairer or component manufacturer to resolve an unresolved conflict with the exact vehicle and part details in hand.
Apply the verified specification and finish the repair
Prepare the work area so that the vehicle is properly supported at its approved points and cannot move unexpectedly. Follow any required electronic parking-brake or brake-system precautions.
- Keep the caliper supported independently of its hose and wiring. Torque accuracy is only one element of a safe assembly process.
- Inspect the fastener and accessible mating components before installation. Look for damaged threads, incorrect hardware, contamination or a seating problem.
-
Do not force a bolt that will not start correctly. If a threaded hole is damaged, determine the approved repair or replacement rather than hiding it with extra tightening effort.
- Confirm that the fastener has the specified length and form. A bolt from a neighbouring connection may look similar but be unsuitable.
- Check whether any required new hardware or sealing pieces are present. Do not proceed with a substitute whose application has not been established.
- Prepare the threads and seating surfaces exactly as directed. Keep guide grease away from threads that must remain dry.
-
Do not remove a factory locking patch unless the service instruction requires it. Where a locking compound is specified, use the correct product and method rather than an arbitrary stronger grade.
- Choose a torque wrench whose operating range and accuracy are suitable for the required setting. A large wrench intended for much higher loads may be inappropriate for a small fitting.
- Check the tool’s condition and calibration requirements. If it has been dropped, damaged or is otherwise suspect, have it checked before relying on it for a brake connection.
- Set and read the correct scale, and follow the tool manufacturer’s operating directions. Use an appropriate socket or bit that fully engages the fastener.
-
Arrange access so the pull can be controlled rather than interrupted by a hose or suspension component. Do not use an impact wrench as the final measuring device simply because it has a labelled power setting.
- Attachments that change the effective lever geometry can require a corrected setting. Follow the torque-tool and adapter instructions rather than assuming every extension has the same effect.
- If access cannot be achieved with a known setup, use the approved tool arrangement or obtain professional help. An uncertain adapter calculation undermines an otherwise correct specification.
- Apply the required stages in the prescribed sequence. Stop at the tool’s indicated point rather than adding an extra pull for reassurance.
-
Where an angle stage is specified, measure it with appropriate equipment. Do not repeatedly tighten the same bolt beyond the completed procedure while trying to confirm it again.
- If a fastener was overtightened, do not assume backing it off and retightening repairs any damage. Assess it and the mating threads under the applicable service instructions.
- If the tightening behavior is abnormal, stop and identify the cause. A wrench clicking on a binding fastener is not a successful inspection.
- Complete all remaining brake-service steps before the vehicle moves. Depending on what was disturbed, that includes hydraulic sealing and bleeding, parking-brake setup, hose routing and checks for proper application and release.
-
Confirm pedal response and inspect for leakage under the specified conditions. The wheel fasteners have their own tightening requirements and must not be assigned a caliper value.
- Keep a record of the specification used and any replaced hardware. If a workshop performs the repair, request a clear description of the work and any damaged mounting components found.
The FTC recommends written repair documentation and clear estimates. A traceable repair record is useful if the same assembly needs future service.
The final decision is straightforward once the evidence is complete.
Use the exact specified procedure for the identified fastener, with the correct parts and tools, then verify the whole repaired brake.
If a key detail remains unknown, obtain it before tightening.
A universal caliper torque number cannot replace that process.


Automotive reference information. Confirm specifications in the manual for your exact vehicle. Original replacement guides link to their research sources. About us