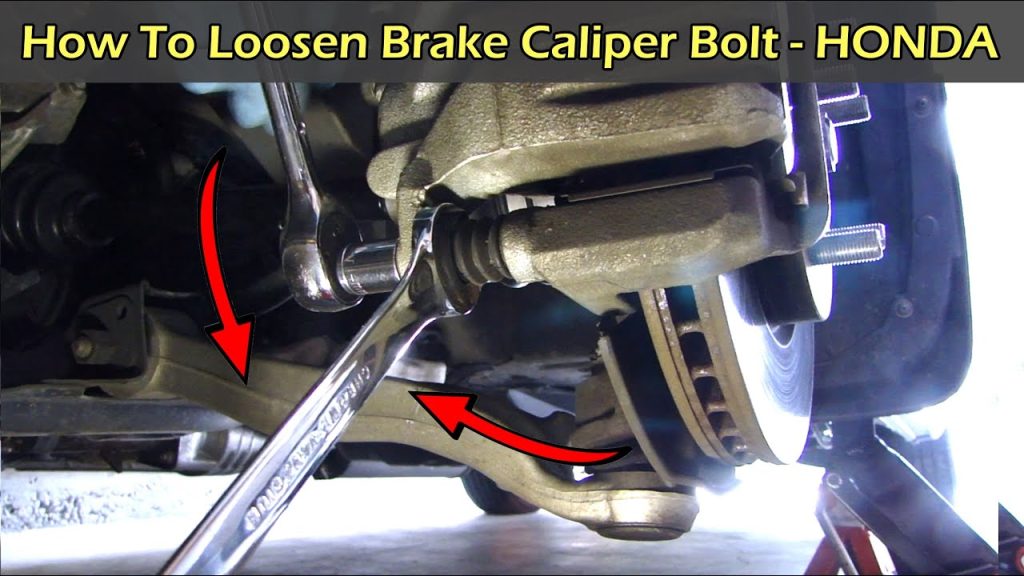

An ordinary right-hand-threaded brake-caliper bolt loosens counterclockwise when you look directly at its head along the bolt’s axis. The crucial detail is the viewing direction. If you are looking from the threaded end or reaching around the back of the assembly, the same rotation can appear reversed.
Do not choose direction from the side of the car, the direction the wheel turns or whether your wrench handle must move upward or downward. First identify the exact fastener and consult the vehicle’s service instructions. A caliper guide bolt, bracket mounting bolt, pad-retaining fastener and hose connection perform different jobs.
They can require different tools, holding methods and replacement rules. The usual right-hand-thread convention is a starting point, not permission to ignore a specified exception or dismantle the wrong connection.
If you are uncertain about the part or its thread, resolve that before adding force. This guide explains orientation and safe removal planning rather than supplying a universal torque or seized-bolt extraction procedure.

Credit: www.clublexus.com
Identify the fastener before deciding how to turn it
The phrase caliper bolt is not precise enough to select a repair procedure. On some floating arrangements, one set of fasteners attaches the caliper body to its guide arrangement and another secures a bracket to the vehicle. A fixed caliper may have a different mounting layout. Pad-retaining hardware can be nearby without being a mounting bolt. A hydraulic connection may also have a hexagonal head, but loosening it opens the brake-fluid circuit.
Do not identify a fastener solely because a socket fits. Use a service illustration for the exact vehicle and brake option. Match the illustrated component to the physical assembly and note what must be supported before its attachment is removed. A casting seam or body-joining fastener should not be disturbed simply to obtain pad access. Some assemblies have restrictions on disassembly that a generic diagram will not show.
The manufacturer’s removal sequence defines the job, including which bolts remain in place. If the purpose is pad service, opening additional joints can create unnecessary repair work. Guide hardware may require a holding tool to prevent another part from rotating. HELLA’s guide-pin information illustrates that a floating caliper is a sliding assembly whose components and protection need correct handling.
A pin spinning with a bolt is not proof that the bolt has a left-hand thread. Observe which piece moves and use the specified holding method rather than gripping a boot or polished guide surface with pliers. The correct tool must engage the intended flats or drive feature without damaging nearby parts. Also establish whether a fastener is reusable and how it must be installed afterward.
Some service instructions call for new hardware, a particular locking treatment or a tightening sequence. Knowing how to loosen the bolt is only one stage. Have the replacement parts and installation specification before dismantling, especially if the vehicle will be immobilized while parts are obtained. A successful removal does not justify reinstalling unsuitable hardware because the old bolt still looks intact.
Read rotation from the head, not from the wheel
For a conventional right-hand thread, imagine a clock drawn on the visible face of the bolt head. Loosening moves around that face opposite to the clock’s hands. The Los Angeles County mechanical study guide describes the usual standard-thread relationship between clockwise tightening and counterclockwise loosening. That explains the general mechanical convention; it does not identify the thread of an unknown brake fastener. Use the application instructions to confirm that the convention applies. The position of a wrench handle can make simple phrases misleading.
When a handle begins above the bolt, its first movement differs from a handle that begins below it even though the bolt turns in the same rotational direction. Advice to push down or pull up therefore lacks the reference needed to be reliable. A photograph taken from the opposite side of the fastener may reverse the apparent movement too. Focus on rotation of the head itself rather than copying another person’s arm motion. The left and right sides of a vehicle do not automatically use opposite thread directions. Similarly, a bolt facing inward can look different from one facing outward without having a different thread.
Do not assume left-hand threads because you are servicing the left wheel. Do not assume a stubborn bolt must be reverse-threaded because ordinary loosening force did not move it. Corrosion, locking provisions, previous damage or an incorrectly selected tool can all explain resistance. The service information resolves thread direction; resistance alone does not. A ratchet adds another possible source of confusion.
Confirm which way the tool actually drives before loading the fastener. The position of its small selector lever may differ between tools, so the lever’s location is not a universal direction code. Check the tool’s behavior away from the brake, then engage it fully and verify the intended movement. If access makes it impossible to see or understand the orientation, improve the safe working position rather than applying force by guesswork. A mirror or reference illustration can help identify the head, but it does not replace the correct support and access procedure.
If the manual specifies a nonstandard thread or a special release method, follow that instruction. Markings can provide clues, but absent or corroded markings do not establish the opposite conclusion. Obtain the correct fastener specification or seek professional help when identification remains uncertain. This is particularly important on modified brakes or assemblies with a history of repairs, where the installed part may not match an assumed factory arrangement. Document what is present before deciding how to proceed.
Apply the correct removal process and stop at damage
Prepare the vehicle using its specified lifting points and properly rated support equipment. Never rely on a jack alone while working around a raised brake assembly. Account for wheel removal, vehicle restraint and any parking-brake service state the job requires. Let dangerously hot parts cool before handling them.
Choose a position that keeps your hands and body out of the likely path if a fastener suddenly releases. Safe access matters as much as choosing the right rotation. Clean enough loose contamination from the drive feature to seat the correct tool without spreading brake dust into the air. Match the socket or bit to the actual head type and size.
A nearly fitting tool can round a fastener before meaningful loosening occurs. Do not substitute an internal hex bit, external socket or star-profile tool merely because it catches an edge. Keep the tool aligned and fully engaged as the procedure requires. If the tool slips or begins damaging the head, stop and reassess before the recovery becomes more difficult.
-
Support the assembly as required before removing its attachment. A freed caliper must not hang from its hydraulic hose or wiring. Plan where it will be held while the intended service continues. If the hose twists or a guide boot winds up as the bolt turns, pause and identify the unintended movement.
- More force can damage the connected parts without solving the actual problem. A bolt that turns without withdrawing may involve damaged threads or another moving component and needs inspection rather than continued spinning. Do not interpret stubbornness as permission to reverse direction repeatedly or increase leverage without limits. Confirm the thread and tool first, then follow an approved recovery method for the fastener and surrounding materials.
- An extension pipe, impact tool or heat source can change the risks considerably. Brake hoses, seals, fluid and nearby components restrict what is appropriate. This article does not recommend heating a caliper or improvising an extraction method. A damaged or seized mounting may require a trained technician with the correct equipment and replacement plan.
- Penetrating products also need controlled use where permitted. Keep them away from friction surfaces and incompatible materials, and do not flood an assembled brake through the wheel. Product residue is not harmless simply because the application helped a bolt move. Our explanation of WD-40 product distinctions near calipers covers why a general brand name does not establish a suitable brake-service use.
Follow the actual product and component instructions, including cleanup and inspection before return to service. After removal, inspect the fastener, mating threads and mounting surfaces as the service procedure directs. A bolt that came out successfully may still be unsuitable for reuse.
Do not repair a damaged connection by choosing a longer bolt, adding washers or using an arbitrary stronger-looking replacement. Correct diameter and pitch alone do not establish length, material, engagement or application suitability. See the caliper-bolt identification guide when ordering hardware.
If the receiving threads are damaged, the repair must follow an approved method rather than a trial-and-error substitution. Reinstallation uses the specified preparation, tightening method and torque for that exact fastener. Do not assume that the effort required to loosen an old bolt is the proper installation torque.
Corrosion and locking provisions can make removal resistance unrelated to the required clamping procedure. Do not add grease or anti-seize to threads unless the instructions call for it, because the specified joint condition matters. Brembo’s caliper fitting guidance directs installers to the vehicle manufacturer’s mounting requirements.
A generic number copied from another car is not an adequate substitute. Finally, restore every support, retainer and disturbed connection and complete the required brake checks. Verify routing, secure attachment and correct operation before any controlled movement.
If the hydraulic circuit was accidentally opened, that expands the job to the relevant sealing and bleeding process. A caliper bolted back into place is not automatically ready for use if another part was strained or damaged during removal. Keep the orientation rule simple—counterclockwise at the head for an identified ordinary right-hand thread—while letting the exact service procedure govern the repair around it.


Automotive reference information. Confirm specifications in the manual for your exact vehicle. Original replacement guides link to their research sources. About us