A damaged fuel-pump diaphragm may cause leakage or inadequate delivery, but starting trouble alone cannot confirm it. First establish that the pump actually uses a diaphragm: a conventional mechanical gasoline pump and a small-engine pulse pump differ from an electric in-tank pump or a high-pressure injection pump. Then identify where any fuel appears and compare the pump's output with the correct service test.
Fuel outside the pump or in a passage that should carry only an air-pressure pulse needs prompt investigation. Do not continue running an engine with an unexplained fuel leak.
This guide focuses on evidence for diaphragm trouble and the other faults that can imitate it. It does not recommend opening an unknown pump, improvising a membrane or treating every low-fuel-delivery symptom as proof of a torn diaphragm.
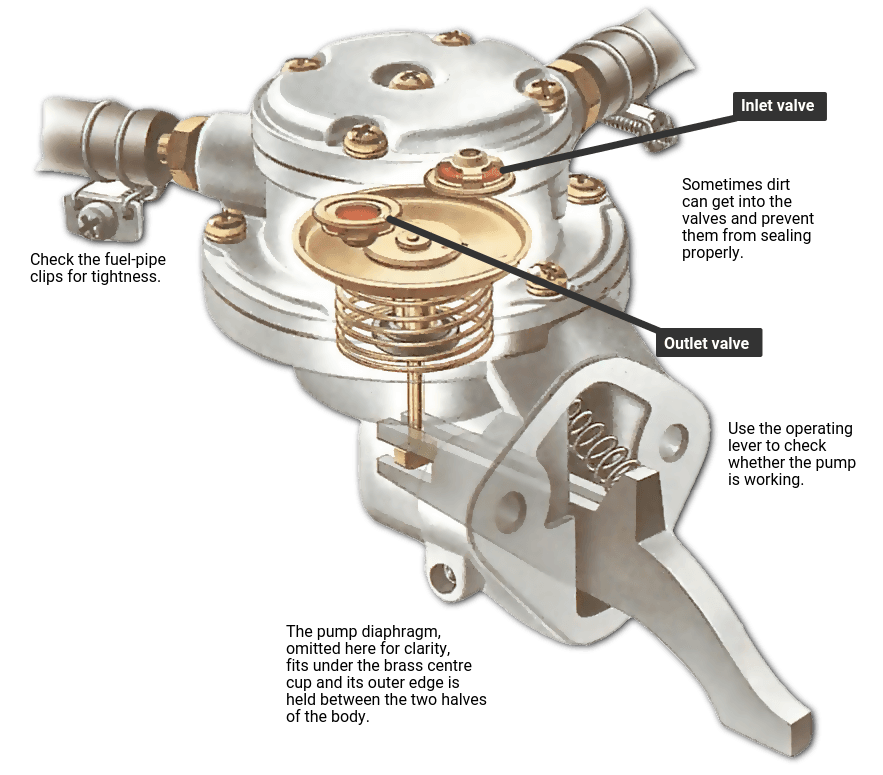
Credit: www.howacarworks.com
Identify the diaphragm system and interpret the clues
A diaphragm is a flexible separator that moves to change the volume of a pumping chamber. The pump's valves direct fuel through that chamber. In a conventional engine-driven design, a mechanical arrangement provides the motion; in a pulse-driven small-engine design, changing pressure provides it. Holley: mechanical fuel pump servicing instructions documents a serviceable mechanical pump arrangement, while Briggs & Stratton: pulse-pump inspection and replacement explains its pulse-pump system. These are distinct examples. A test or rebuild instruction for one should not be transferred automatically to the other. External fuel wetness is a strong reason to stop, but it must be localized.
A hose connection above the pump can leak down its housing and make the diaphragm joint appear to be the source. Clean-up and inspection must be performed safely with the system isolated as directed. Do not use a running engine and your fingers to search for the wet point. A technician should distinguish a leaking line, cracked housing, fitting or diaphragm-related seal before deciding which component needs replacement. On the Briggs & Stratton pulse-pump arrangement described in its guidance, gasoline should not be present in the pulse line. That is a useful model-specific clue because the line transmits the operating pulse rather than serving as the normal fuel outlet. If such fuel is found, stop using the engine and follow the applicable inspection procedure.
Do not assume that every small hose on every pump is a pulse line. Identify inlet, outlet and pulse connections from the correct drawing before interpreting what is inside them. A poor pulse supply can imitate a failed pumping diaphragm. A damaged or disconnected pulse hose, an incorrect connection or an engine-side problem can prevent the pump from receiving its intended operating signal. Replacing the pump alone does not correct that. Check the hose and its routing using the engine manual, not by connecting it to whichever fitting seems to have vacuum. The signal source and hose condition are part of the pump system.
A steady vacuum source is not automatically equivalent to the specified pulsating source. On a mechanically driven pump, the operating mechanism must also be considered. An incorrect installation or drive-related problem can limit movement without the diaphragm itself being torn. Do not use mounting bolts to force an incorrectly positioned pump into place. The appropriate service information identifies the lever or pushrod relationship and any installation checks. A low delivery result needs that context before it becomes evidence of internal pump damage. The external appearance of a new or old pump cannot establish its actual operating stroke.
Fuel starvation can also originate before or after the pump. A restricted pickup, unsuitable filter, damaged hose or carburetor inlet problem may produce similar running symptoms. A pulse pump that receives insufficient fuel cannot deliver what the engine requires, even with an intact diaphragm. A carburetor that cannot admit fuel can make a pump appear ineffective. Test the system in the sequence specified for the engine so that upstream supply and downstream demand are not ignored. Changes in engine oil condition require caution as well. An unexplained rise in oil level or suspected fuel dilution should not be treated as a harmless side effect of a starting problem.
Stop operation and investigate the source using the engine's service information. Do not diagnose a diaphragm solely by smelling the dipstick, because fuel can enter an engine through other faults. Where the pump design provides a possible path, that possibility belongs in the diagnosis rather than being declared the only explanation. A torn, cracked or otherwise damaged diaphragm found during an authorized inspection is more direct evidence than a general symptom. Even then, examine why it failed and whether the pump is intended to be rebuilt. Age, material condition, incompatible parts or incorrect assembly can affect the result. A generic piece of rubber is not an acceptable replacement membrane.
The diaphragm must have the correct material, shape and mechanical characteristics for the fuel and pump. Use only the specified kit where the manufacturer supports servicing. Some pumps are replaced as complete assemblies. A visible seam or screw does not necessarily mean that a service kit exists or that disassembly is the correct repair. Briggs & Stratton distinguishes serviceable arrangements from pump types that are replaced rather than repaired. Holley: mechanical fuel pump servicing instructions also illustrates that supported servicing has a defined parts and assembly procedure. Follow the exact product documentation; do not borrow a rebuild method merely because another pump looks similar.

Credit: mgaguru.com
Choose a test and repair that answers the actual question
Start with identification: engine model, pump part number, fuel type and the symptom. Photograph hose routing before authorized disconnection, but treat the correct manual as the reference if an earlier repair may have routed it incorrectly. Record whether the fault appeared after storage, a hose change, pump replacement or another service. Those details help distinguish a deteriorated component from an installation error. A pump that stopped working immediately after a line was moved deserves a routing check before internal failure is assumed. Use the manufacturer's prescribed output test and safety setup. Fuel collection, ignition isolation and cranking conditions differ between applications. Do not improvise a test by spraying fuel from an open line near an ignition source. Do not apply compressed air to an assembled pump unless the exact procedure calls for a controlled pressure test with suitable equipment. Excess pressure can damage a diaphragm or push fuel into a place it should not be. A test must establish a relevant result without creating a new fault. Interpret the result alongside the pump's input conditions. If output is poor, determine whether fuel is reaching the inlet and whether the drive or pulse is present as specified. If output is correct, investigate the downstream system rather than replacing the diaphragm anyway.
If leakage is present, identify its exact path. For example, poor delivery after a hose replacement calls for checking the new hose specification and routing before dismantling the pump. Fuel found at a documented pulse connection instead directs attention toward an abnormal separation between fuel and pulse chambers. These observations lead to different tests, even if both engines hesitate. The distinction is why a single generalized symptom chart cannot reliably diagnose the diaphragm. A useful report states the test condition, observed result and required specification. Simply saying the pump is weak leaves too much uncertainty about what was checked. When rebuilding is supported, use the specified kit and assembly sequence. Springs, valves, gaskets and diaphragm orientation can matter as much as the membrane itself. Tightening a cover unevenly or using the wrong stack of parts can create leakage or restrict movement. Do not apply an unapproved sealant to compensate for damaged surfaces. If the housing is cracked or distorted, a new diaphragm may not provide a reliable repair. The correct decision may be assembly replacement rather than another attempt to make mismatched parts seal.
When replacing the pump, verify application and hose assignments before installation. Similar nipples do not prove identical functions. Replace damaged hoses or retaining parts as required and restore the intended route away from heat and moving components. A hose that is too short can load a fitting; a poorly routed one can kink or rub. These are installation conditions, not evidence that the new diaphragm is defective. Inspect them before the first operating test. After repair, perform the prescribed leak and delivery checks and address any contaminated engine oil according to the engine procedure. Confirm that the original complaint is resolved under safe conditions. Do not return the equipment to use merely because it starts once if an earlier leak remains unexplained. Keep the old part or clear photographs where useful for warranty or diagnosis, and record the replacement number and findings. The strongest conclusion combines direct evidence with a controlled test: the pump is the correct type, its supply and drive are adequate, its output or sealing fails the specification, and inspection or replacement identifies the defect. If only a symptom is known, the diaphragm remains one possibility rather than a proven cause. That distinction helps avoid unnecessary parts and, more importantly, prevents continued operation with fuel where it does not belong.


Automotive reference information. Confirm specifications in the manual for your exact vehicle. Original replacement guides link to their research sources. About us