
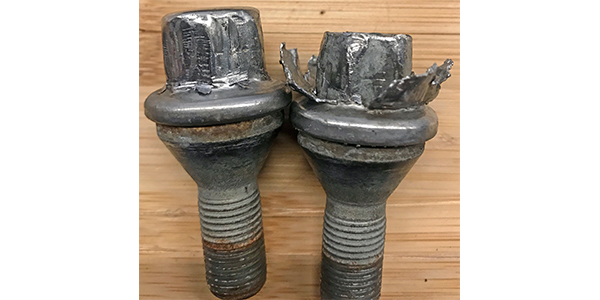
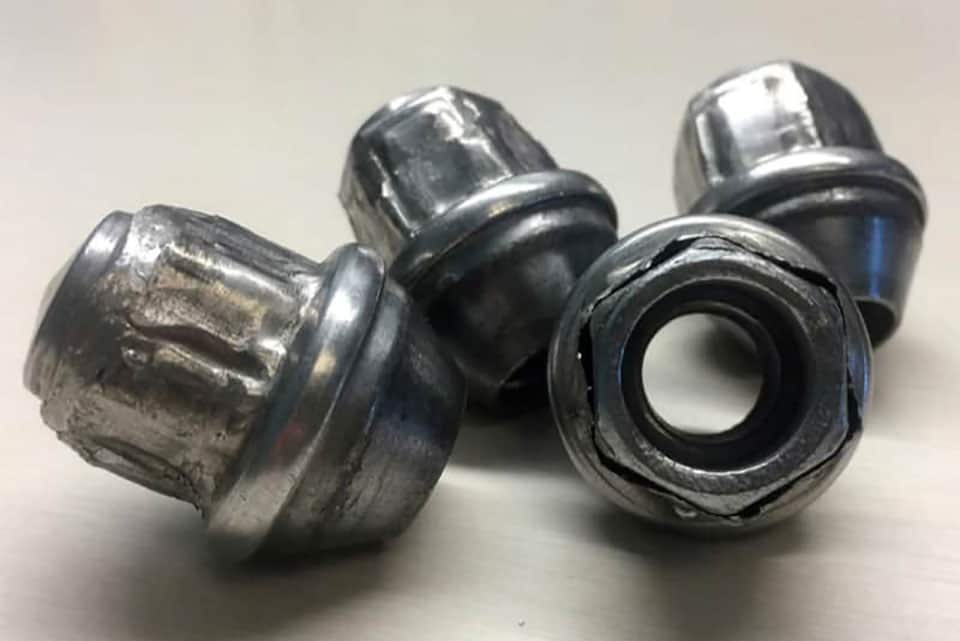
Swollen lug nuts commonly involve a capped, two-piece design whose outer covering becomes distorted. Corrosion, damage or separation around the cap can make the original socket difficult to fit even though the nut's threaded core has not simply grown into a larger fastener.
The practical problem is serviceability: the factory wrench may no longer seat securely when a wheel must be removed. Inspect the affected hardware and replace unsuitable or damaged nuts with the correct application.
Do not assume that every tight socket proves swelling, or that a swollen cap alone establishes whether the wheel is securely clamped. Those are related but separate inspection questions.
Credit: www.brakeandfrontend.com
Identify the fastener construction
Look at the nut design and the application information before deciding what changed. Some nuts have an outer decorative cap, while others are one-piece designs. The visible surface can therefore tell only part of the story. A damaged covering may affect tool engagement without revealing the condition of the threads or the wheel seat underneath.
The nut still has an attachment job
Wheel hardware must match the thread and seating arrangement and secure the wheel as designed. Appearance is secondary to that function. When a cap problem is found, inspect the rest of the fastener and its mating surfaces as appropriate. Replacing a shiny cover or choosing a similar-looking nut is not a complete fitment check.
Two-piece construction is a specific design feature
Do not describe every chrome-colored nut as the same construction. Product details and inspection establish whether a separate cap exists. GM bulletin 22-NA-090 addresses stainless-cap cracking, rusting and swelling on listed Silverado and Sierra applications. That document is evidence for its stated vehicles, not a universal recall or diagnosis for all brands.

Credit: www.freep.com
Start with the socket-fit symptom
A socket that previously fitted but now will not seat fully is a reason to inspect. Check that the socket is the correct size and undamaged first. Dirt, rounding and a different replacement nut can also explain poor fit. Do not hammer a random oversized socket onto the nut before identifying the actual condition.
Look for distortion and damage
A cap may appear bulged, cracked or uneven, and the flats may no longer accept the proper tool cleanly. Photograph the condition while the vehicle is safely parked. Avoid prying or cutting the cap as an exploratory step. An external inspection can establish the need for service without committing to a damaging removal method.
Tool slippage changes the removal decision
If the socket rocks or slips, more force can round the remaining engagement surfaces. Stop before the fastener becomes harder to remove. A workshop can assess the appropriate extraction equipment and replacement requirements. The objective is controlled removal and a sound replacement joint, not proving that a stronger lever can overcome any damaged shape.
Moisture exposure can contribute to deterioration
Road exposure and trapped moisture can be relevant to corrosion-related cap problems, but appearance alone does not establish the complete cause on an individual nut. Consider age, condition and service history. Avoid assigning blame to one wash product or one tire visit without evidence linking that event to the damage. A vehicle used in wet or salty conditions may deserve closer corrosion inspection, but a dry climate does not guarantee undamaged hardware. Inspect the actual nuts and tool fit. Serviceability should be checked from the condition in front of you, not assumed from a general description of where the car has been driven.
Keep cleaning advice product-specific
Use cleaning products compatible with the wheel and hardware finish. Do not apply aggressive chemicals in an attempt to shrink a distorted cap. Cleaning may reveal the surface condition, but it cannot restore a damaged shape reliably. If corrosion or deformation affects removal or fitment, assess replacement rather than relying on cosmetic improvement.
Distinguish corrosion from manufacturing claims
Rust or distortion can be observed, but proving a manufacturing defect requires more than an online comparison photograph. Check any applicable manufacturer information and have the part assessed. Do not assume that a bulletin covers your vehicle simply because its symptom sounds similar; model, year and other applicability details matter.
Inspect more than the visible face
A service inspection can evaluate the seat, threads and stud as well as the cap. Damage elsewhere may require additional parts or work. A replacement nut should not be installed over a damaged stud merely because it starts turning. The complete connection must be suitable before the wheel is returned to use.
Do not equate a brand with a guaranteed outcome
A one-piece replacement may avoid a particular cap-related failure mode, but it must still be the correct hardware. Material, dimensions, seat and application matter. A product advertised as an upgrade is not automatically compatible with every wheel. Use documented fitment rather than choosing only by price, finish or marketing language.
Routine access checks can prevent a roadside surprise
At suitable maintenance opportunities, confirm that the wheel tools match the installed hardware. This is especially useful after hardware or wheel changes. The check should not involve randomly loosening fasteners without the correct retightening procedure. Its purpose is to discover missing keys or poor tool fit before an emergency tire change.
A difficult emergency change is a reason for assistance
If the supplied wrench cannot engage a damaged nut safely, do not keep jumping on it or improvising a long pipe at the roadside. The vehicle location and support conditions may already be unsuitable for forceful work. Arrange assistance so removal can be performed with stable support and the right equipment.
Avoid temporary reshaping as a permanent repair
Removing or crushing a cap may change the tool fit but does not establish that the remaining nut is appropriate for continued use. The extraction process can damage the hardware. Have it inspected and replace it when required. Do not treat a newly exposed surface as proof that the original problem has been permanently solved.
Check whether manufacturer guidance applies
Use the VIN, model year and installed part information when discussing a known issue with a dealer or repairer. A service bulletin is not automatically a recall or a promise of free replacement. Ask what applies to this vehicle and what the inspection found, keeping coverage questions separate from the immediate need for serviceable hardware.
Preserve evidence for a coverage discussion
Photographs, service dates and the removed parts can help explain the complaint. Keep the invoice for any replacement. Do not delay a necessary safe repair solely to gather more online examples. A documented condition and the actual vehicle details provide a stronger basis for discussion than a general claim that all capped nuts fail.
Check replacements against the wheel, not only the car
An aftermarket wheel may require a different seat or hardware arrangement from the factory wheel. Tell the supplier what is actually installed. McGard's installation guidance emphasizes matching thread, seat and style and checking for bottoming. A nut that threads on is not necessarily securing the wheel correctly.
Consider the spare-wheel arrangement
The spare may not use the same hardware as an aftermarket road wheel. Verify the appropriate parts before discarding all original fasteners. Keep required tools and hardware securely with the vehicle. This avoids solving the everyday-wheel problem while creating a new inability to fit the spare during an emergency.
Separate cap swelling from confirmed looseness
A swollen covering does not by itself quantify clamp load or prove that the wheel is loose. Conversely, a normal-looking nut does not prove correct installation. If looseness, movement or missing hardware is found, stop using the vehicle and have the attachment assessed. Do not let the cosmetic explanation obscure a separate safety problem.
Replace based on inspection and application
The repairer should assess the affected hardware and whether other nuts have the same serviceability problem. Ask what is being replaced and why.
A single damaged nut and a set showing widespread cap distortion may lead to different recommendations. The decision should follow condition and compatibility rather than an automatic sales rule.
Use the correct installation procedure afterward
Install the approved replacement hardware using the specified conditions, sequence and torque. Do not add lubricant or anti-seize merely because corrosion was involved unless the applicable instructions permit it.
Changing thread friction can alter the intended tightening result.
The replacement should solve the serviceability problem without introducing an attachment problem.
Credit: www.fordproblems.com
Confirm the removal tools now fit
After replacement, verify that the vehicle's wrench or required socket fits the new nuts and that any wheel-lock key is present. Tire Rack's service FAQ identifies swollen hardware as a practical obstacle to wheel service. Tool access is therefore part of completing the repair, not an optional detail to discover later.
Record the new hardware details
Keep the part number and application information with the service record.
If a later wheel change occurs, the installer can verify what is present instead of assuming all hardware remains factory original.
Clear records also help obtain matching replacements if one nut is damaged or lost during future service.
Inspect again when the wheels are serviced
Use future tire rotations or wheel work to check condition, proper fit and the applicable recheck requirement.
Do not create an arbitrary replacement interval for every capped nut.
Condition-based assessment and the manufacturer's instructions are more useful than promising that a particular design lasts a fixed number of years in every environment.
Record any change in tool fit when it is found.
Solve the serviceability problem completely
A swollen cap is a reason to inspect and arrange appropriate removal and replacement, especially when the correct wrench no longer fits. Identify the design, confirm the damage and choose hardware that matches the actual wheel.
Preserve the distinction between cap distortion and attachment integrity. The completed repair should leave both a correctly secured wheel and tools that can service it when needed.


Automotive reference information. Confirm specifications in the manual for your exact vehicle. Original replacement guides link to their research sources. About us


