
Install Rain-X Latitude wiper blades by identifying the complete product name, confirming the vehicle application and using the instructions for the connector actually fitted to the arm. The crucial detail is that Latitude and Latitude Water Repellency have separate entries in Rain-X’s installation directory. A generic instruction to push until something clicks can miss a retaining door, the wrong adapter or a different blade generation. Begin with the package in your hand, rather than assuming every online Latitude demonstration shows the same hardware. This guide explains the checks around installation, the manufacturer’s current J-hook troubleshooting advice and how to verify the finished fit before driving. It does not turn one connector’s release method into instructions for every vehicle.
Identify these three things before removing a blade
- The exact replacement: keep the carton, part number and instruction sheet beside you. Check whether it says Latitude or Latitude Water Repellency, and identify which side of the windshield the application calls for. A blade’s length alone does not establish its connector compatibility. If your order contains two different numbers, label their intended positions before opening both packages.
- The existing arm: examine the connection while the old blade remains attached. A J-hook has a curved metal end; other mechanisms can use a push button, pin or tabs. Match the actual shape to the manufacturer’s diagram. Do not identify it solely from a neighbour’s car or an old video with a similar model name. A replacement arm may differ from factory equipment.
- The vehicle procedure: find the owner manual’s wiper replacement section and any required service position. Have suitable glass-cleaning materials and a clear, well-lit working area available. Resolve a missing instruction sheet or uncertain application now. It is easier to ask the supplier while the old blade is still secure than while an exposed spring-loaded arm is being held above the windshield.
Put the vehicle in its specified service position
Park safely and follow the vehicle’s instructions for switching the wipers off and accessing the arms. Some blades park beneath the hood edge and must first be moved electronically to a maintenance position. DENSO’s replacement guidance specifically warns that lifting from the normal parked position may be obstructed by the hood. Do not pull harder when the arm contacts bodywork. Use the manual’s sequence and check that automatic wiping cannot start while your hands are at the connection. Work on one blade at a time, keeping control of the arm throughout. An exposed arm can damage the windshield if it falls; a protective cloth is an extra precaution, not a substitute for holding it securely. If the arm will not lift far enough for the specified operation, leave the blade attached and obtain vehicle-specific assistance.
Release the old connector without borrowing its hardware
Study the old blade’s release mechanism before applying pressure. Its instructions may differ from the Rain-X replacement because the outgoing blade could be a different brand or connector design. Support the arm, operate the correct latch and separate the blade in the direction shown for that mechanism. Stop if you cannot identify what retains it. Prying a guessed tab can break a part that belongs to the arm rather than the discarded blade. Keep the removed assembly nearby until the replacement has passed its checks, but do not automatically transfer its adapter to the new one. The new product’s supplied connector system determines which parts it uses. Loose pieces left on the arm deserve investigation: establish whether each belongs to the vehicle or to the old blade before fitting anything over it.
Choose the instruction branch that matches your package
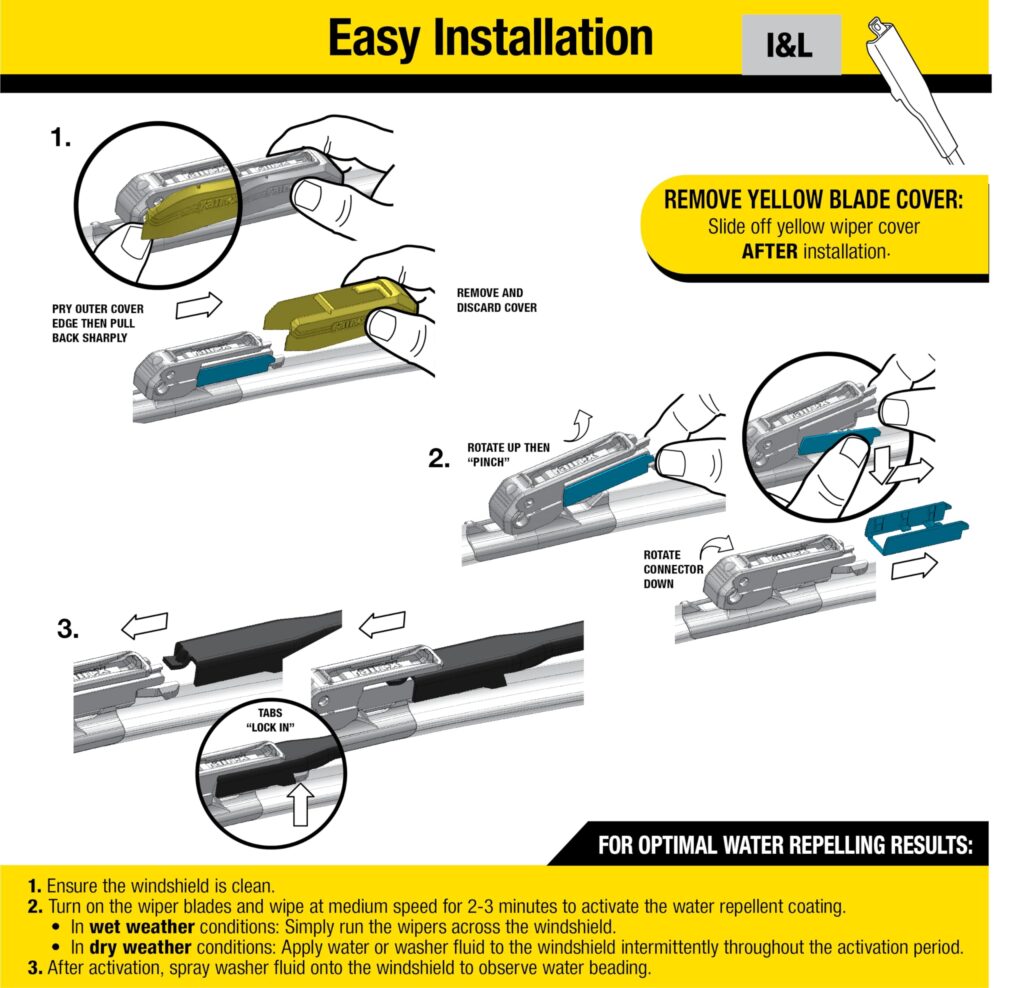
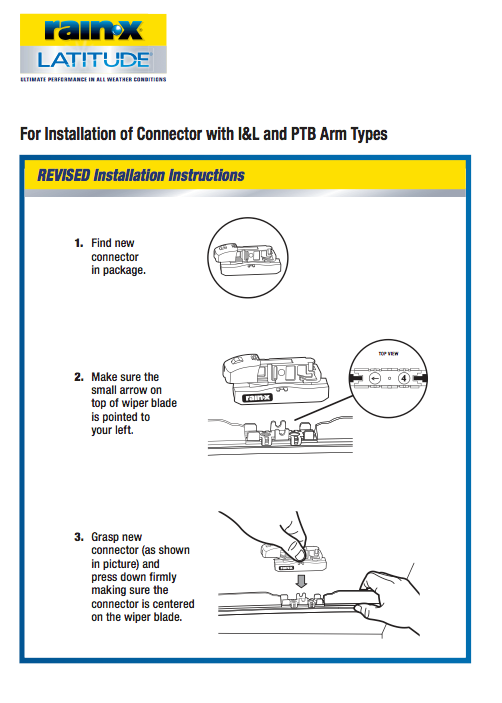
For the original product, use the Latitude installation selector; for the coating-equipped version, use the Latitude Water Repellency selector. Select the arm type shown on your vehicle and compare the adapter pictured with the one supplied. Rain-X provides different installation branches because the retaining arrangements are not interchangeable instructions. Watch the complete relevant demonstration before starting, then pause at the connection detail if necessary. An older demonstration can remain useful for matching older hardware, but its age is a reason to check the physical adapter carefully. Do not choose a video simply because its title contains Latitude. If the package illustration and online example disagree, use the full part number when requesting clarification from Rain-X or the seller. Cutting a plastic rib or combining unrelated adapters is not a valid way to resolve that disagreement.
Seat a matching J-hook fully before closing its door
Rain-X’s February 2026 support note for the newer Latitude Water Repellency J-hook adapter describes two locking events. The hook enters the adapter’s centre and moves fully toward the back, passing a tight internal lock with a firm push. That produces the first click. Closing the retaining door produces the second. This explains why a door can appear reluctant to close when the hook has not reached its proper seated position. Apply that advice only after confirming that your blade has the adapter described and your arm is the correct J-hook application. Support the assembly while seating it; do not hammer it, pry the door closed or bend the vehicle arm to create clearance. Persistent resistance, distortion or a broken latch is a reason to stop and check the fit. A click from the door alone does not replace the separate internal seating check.
Inspect the mechanical connection before operating the wipers
With the vehicle still in the safe service state, compare the finished connection with its instruction diagram. The required latch or door should be fully engaged, the arm should occupy its intended channel and the blade should remain retained during a gentle security check. Look for a loose adapter, displaced cover or packing material along the wiping edge. Remove only a protector identified as removable by the product instructions; the working rubber and structural parts must remain intact. Lower the blade carefully onto the glass and repeat the process for the other specified position. Check that neither assembly has been swapped to the wrong side. Our guide to position-specific blade lengths explains why guessing the longer side is unreliable. Return the wipers from service position only after both arms are safely lowered as the vehicle manual requires.
Run a controlled check, then resolve any remaining symptom
- Check movement while parked: clear tools and hands from the sweep area, wet the windshield appropriately and operate the wipers using the vehicle controls. Observe the whole sweep and parked position. Stop immediately if a blade strikes trim, overlaps the other blade, moves at its connector or leaves an obviously unwiped area that suggests incorrect fit. An attachment problem needs correction before a road test.
- Treat repellency activation as a separate step: Rain-X’s water-repellency instructions specify two minutes of operation on a clean wet or dry windshield for the relevant coating-equipped blades. Use the compatible wet-glass option where the vehicle instructions call for it, and follow any package-specific update. This conditioning step does not secure a loose adapter and is not an instruction to run ordinary blades dry.
- Separate poor wiping from poor attachment: if the connection is secure but the new blade smears or squeaks, inspect for a forgotten protector, dirty glass or an unsuitable application. Our new-blade squeak guide follows that installation-focused investigation. Do not add oil to the rubber or modify the arm as an experiment. Ask for help when the blade cannot clear the driver’s view reliably.

Credit: www.youtube.com
Check vehicle restrictions before activating a coating
A product’s installation instructions and a vehicle’s maintenance restrictions both matter. For example, the linked North American Tesla Model 3 owner-manual section calls for blades matching the original specification and warns against washer fluids containing water repellent or bug wash. Those washer-fluid instructions alone do not establish approval or rejection of a coating-depositing blade. That is a vehicle-specific limitation, not a statement that all Rain-X products fit a Model 3 or that every vehicle has the same restriction. Check your own manual before installing a blade that deposits a treatment. If the vehicle guidance and proposed coating conflict, resolve the choice with the vehicle maker or choose an approved alternative before use. A successful mechanical attachment alone does not establish treatment compatibility. Similarly, the words universal adapter describe broad application coverage, not permission to fit an unlisted vehicle, rear arm or unusual washer-equipped assembly.
Credit: internationalfilters.com
What to keep when an installation needs support
Keep the receipt and package until you have confirmed both secure attachment and satisfactory wiping. If support is needed, provide the vehicle’s year, model, market, blade position and full Rain-X product number. Include clear photographs of the arm end, supplied adapter and the stage where progress stops. State whether the internal latch seats, whether the door closes and whether anything looks damaged. Those observations are more useful than a general report that the blade does not fit. Do not discard an adapter because it appears unused until the matching instructions confirm its role. For a broader explanation of connector and application differences, see why wiper fit requires more than blade length. The job is complete when the intended blade is properly retained, moves without interference and clears the windshield effectively—not simply when it has been pushed onto the arm.


Automotive reference information. Confirm specifications in the manual for your exact vehicle. Original replacement guides link to their research sources. About us