
A stuck spark plug in an aluminum cylinder head is a joint problem, not simply a stubborn fastener. The repair must preserve the head's threads, the sealing seat and the combustion chamber while removing the plug. More force can sometimes move the plug while damaging the part it screws into, so movement alone is not a successful outcome.
If the plug is binding, crooked, broken or carrying metal from the head, stop routine removal and arrange an application-specific assessment. This guide focuses on deciding what damage may be present and how to evaluate the proposed repair. It does not provide a universal drilling, tapping or insert-installation procedure.
Those operations depend on the head, plug seat, access and repair system. A sound repair must restore correct positioning and sealing, not merely create a hole that accepts a new plug.

Credit: www.championautoparts.com
Identify the head and its repair history
Give the workshop the vehicle identification, engine code, affected cylinder and any previous spark-plug or cylinder-head repair invoices. Ask whether that hole already contains an insert. A previously repaired bore may require different tooling and may offer fewer remaining repair options than an untouched head. Record whether the plug was difficult throughout removal or loosened and then jammed. Also note any earlier chuffing noise, combustion staining or loose-plug symptom, because the sealing seat could need examination. Do not assume all aluminum heads use the same thread size, available wall thickness or approved repair method. The engine's identity is the starting point for deciding what can safely be done.
Inspection tools matter before extraction tools
Good lighting, suitable access and an inspection camera may reveal problems that cannot be identified by ratchet feel. A technician may inspect the well, hex, visible threads and eventually the chamber before selecting an extractor. Ask what evidence supports the proposed approach. A generic kit advertised for many engines is not by itself proof that the guide, tap and insert are suitable for this head. Tools must fit the actual failure mode and maintain alignment. If access prevents inspection or controlled tool positioning, additional dismantling may be necessary. That can be a sensible preparation cost rather than needless extra work.
Respect the specified temperature condition
Begin with the engine prepared according to its service information. NGK’s installation resource warns about servicing plugs while hot and explains that both seating and head material matter. Do not interpret thermal expansion as permission to heat the area with a torch or restart a partially dismantled engine. A difficult joint may also contain chemicals from earlier attempts, making uncontrolled heat particularly inappropriate. Tell the technician whether removal was attempted hot, cold or after an uncertain cooling period. That history cannot diagnose damage by itself, but it helps explain what the joint has experienced and prevents repeating an unsuitable approach.
Protect the open engine and the evidence
Keep ignition disabled as specified and prevent anyone from starting or cranking the engine while broken material or liquid may be present. Organize removed coils and fasteners so nothing can fall into openings. Use suitable eye protection and the workshop precautions appropriate to any cleaning product. Preserve the old plug and any fragments rather than discarding them after extraction. Comparing the pieces is part of determining whether the chamber is clear. Do not assume a missing fragment is harmless because it is small or the engine previously ran. Until it is accounted for, the repair assessment remains incomplete.

Credit: www.agriculture.com
Resistance has several possible explanations
A plug can resist removal because of deposits, corrosion, previous over-tightening, incorrect installation or existing thread damage. These possibilities can overlap. For example, a plug that entered the head at an angle may have damaged threads long before the current service. A dirty or obstructed well can also make tool engagement poor without proving that the head threads are seized. The workshop should separate those observations rather than diagnose the head solely from the force needed at the handle. Ask whether the problem appears to be at the threaded joint, below it, or in a broken component left behind.
Corrosion evidence needs context
Rust visible in the plug well deserves attention, but it does not establish the condition of every thread below the sealing seat. Water entry, a damaged boot or repeated moisture exposure may need investigation after the immediate repair. Photograph deposits and any standing liquid before cleanup when possible. If the extracted plug has damaged or contaminated threads, the head bore still needs independent inspection. Do not use appearance alone to select a chemical or decide that the bore needs cutting. The practical question is whether the mating surfaces remain intact and can support the specified installation and seal.
Cross-threading and pulled metal change the repair
A plug that sits at an unusual angle, binds well before seating or emerges with metal attached may indicate a damaged thread path. Do not run a new plug into the hole as a test using a wrench. That can obscure the original damage and make further material removal seem necessary. Ask the technician to distinguish contamination from displaced or missing parent metal. Cleaning a serviceable thread and replacing missing thread support are different repairs. Neither should be selected merely because a universal thread chaser is available. The bore's geometry, remaining material and seat condition determine what repair is feasible.
Binding below the threads is a different problem
Some plug designs can bind at a portion extending below the threaded section. Ford’s three-valve plug bulletin is one example involving specified engines and build dates, not all aluminum heads. It distinguishes several ways a plug can separate during removal. That matters because a remaining shield or porcelain component is not the same as stripped threads in the head. Ask the workshop to identify which component remains before authorizing drilling or a thread repair. Unnecessary cutting cannot fix a misidentified failure. The safest tool choice follows the inspection, rather than determining the diagnosis in advance.
Evaluate the proposed extraction plan
A useful explanation from the workshop should cover the identified failure, how the tool stays aligned, how debris is controlled and what would cause the attempt to stop. Ask what happens if the first method fails and whether additional work requires your authorization. Avoid requesting a guarantee that the head will remain installed; some conditions cannot be resolved safely through the plug opening. Equally, a damaged plug does not automatically establish that the entire head must be replaced. The decision needs evidence from the specific bore and chamber. A staged estimate can separate inspection from extraction and any subsequent repair.
Chemical treatment must match the identified fault
Ask what the chemical is intended to reach and why the chosen procedure is appropriate. A deposit below the threaded joint is not necessarily accessible to a spray sitting above the seat. Keep a record of any liquid previously applied. The workshop needs that information when deciding whether the cylinder must be checked before the engine can be turned.
One of the simplest yet most effective methods is applying penetrating oil. This helps loosen the stubborn spark plug by breaking down rust and debris. Apply the oil generously around the base of the plug. Let it sit for a while—some people recommend waiting overnight for the best result. Try turning the plug gently after the wait. You might be surprised at how easily it comes out. Have you ever wondered how something so simple can be so effective? ###Heating requires an approved application-specific method
Do not ask the shop simply to heat the aluminum until the plug releases. Ask which service procedure supports its temperature conditions and how adjacent components will be protected. If a chemical has already been used, disclose it before any further work. A controlled professional process must address the actual joint, rather than relying on an assumed expansion difference.
Heat can be a powerful ally in your quest to remove a stuck spark plug. When metal expands, it can release its grip on the plug, making removal easier. Use a heat gun or torch to apply heat evenly around the plug area. Be careful not to overheat, which could damage the aluminum. Once it’s warm, try turning the plug with your socket wrench. You’ll often find it loosens much easier. Isn’t it fascinating how heat can change the game? ###Impact force is not a substitute for alignment
An impact tool does not reveal whether a shell, head thread or ceramic component is taking the load. For an uncertain joint, preserving control and observing its response are more useful than applying repeated shocks. Ask the technician to explain any specialized method in the context of this plug design. Do not treat a successful demonstration on another engine as authorization.
Impact drivers are a game changer in removing stuck spark plugs. They deliver short bursts of torque, which can help break the bond between the plug and the head. Attach the driver to your socket set and apply it to the spark plug. Use controlled bursts to avoid damage. It’s amazing how this tool can make a seemingly impossible task achievable. Have you ever used an impact driver in a tricky situation? These techniques are practical, actionable, and can save you from the frustration of being stuck with a stubborn spark plug. Remember, patience and precision are your best friends in this process. Which method will you try first?Broken-shell tools are not interchangeable
Champion’s broken-plug discussion notes that extractor shape can affect how a remaining shell behaves. Treat that as an illustration of why tooling matters, rather than a universal do-it-yourself recipe. Some tools expand or grip the remaining part differently, and a fragment containing porcelain requires another assessment from an empty shell. If a broken tool becomes lodged, the repair can become substantially harder. Ask whether the proposed tool is intended for the remaining component and whether the technician has clear access. Do not choose a repair solely on the lowest quoted extraction price without understanding these conditions.
When head removal becomes the reasonable option
Limited access, unaccounted debris, an unsuitable seat or damage beyond an approved repair system's limits may justify removing the head. That decision should be tied to the findings, not presented as inevitable for every stuck plug. With the head removed, additional inspection and machining options may be available, but labor and associated gaskets or fasteners also change. Ask for an explanation of the alternatives, their limitations and what each estimate includes. If further damage is discovered after disassembly, request photographs and a revised plan. A transparent repair boundary is more useful than an optimistic price that assumes everything will go perfectly.
What an insert repair must accomplish
A thread insert is a repair system with dimensional and installation requirements, not a generic filler for any damaged hole. The selected method must be appropriate to the engine and restore the plug's position, retention and sealing relationship. Ask which system is proposed, why it is suitable, and how installation depth and alignment will be checked. Also ask how chips and other debris will be removed and verified. Do not accept thread sealant or adhesive alone as an explanation for replacing missing structural thread support. If the seat or surrounding casting is damaged, an insert may not address the complete problem.
Reassembly torque does not certify an unknown bore
A torque wrench is important for the finished installation, but reaching a number does not prove that a damaged hole is correctly repaired. Friction or debris can produce resistance before proper seating. The repair should first establish that the plug enters correctly and that the specified seat and threads are serviceable. Then use the applicable installation method and tool. Ask the workshop to document the replacement part and torque specification used, as well as any insert. This creates a useful service record and helps the next technician avoid treating the repaired hole as an undocumented standard assembly.
Prevent another repair through accurate service records
Retain the cylinder location, repair-system identification, installed plug number and any special servicing instructions supplied by the repairer. Follow the vehicle's replacement schedule and investigate unusual misfires or signs of leakage promptly. Do not periodically remove plugs simply to test whether they are getting tight without a maintenance reason. Each service should use the correct access and installation procedure. NGK’s coating guidance also explains why adding anti-seize is not a default precaution for its plated plugs. A difficult past removal does not justify an improvised lubricant or a reduced torque chosen by guesswork.
Preventive measures are essential if you want to avoid the hassle of removing a stuck spark plug from an aluminum head again. These measures not only save time and effort but also extend the life of your engine components. By making a few smart choices, you can keep your engine running smoothly and avoid costly repairs.Use the vehicle maintenance schedule
Check the schedule for the exact engine and market, including any applicable service updates. Record the mileage and date of the repair rather than guessing the age of the previous plugs. If the manufacturer specifies a later inspection after a particular repair, retain that instruction with the invoice. Otherwise avoid inventing extra removal intervals as a precaution.
Regular maintenance is your first line of defense against stuck spark plugs. Make it a habit to check your spark plugs during routine oil changes. This ensures they are in good condition and makes it easier to spot any early signs of wear or damage. Inspect your spark plugs for corrosion or buildup. Clean them if necessary to maintain optimal performance. Keeping your engine clean and well-maintained can significantly reduce the risk of spark plugs getting stuck.Confirm part fit and seating before tightening
Compare the specified replacement with the application information, including seat style and thread reach. A matching socket size does not establish compatibility. If the plug cannot be started and seated by the prescribed method, stop and recheck the bore and part. Forcing it to seat can conceal the problem the repair was supposed to solve.
Proper installation is crucial in preventing stuck spark plugs. Always follow the manufacturer’s torque specifications when installing spark plugs. Over-tightening can cause them to seize in the aluminum head. Use a torque wrench to ensure you’re applying the right amount of force. This tool helps prevent the common mistake of over-tightening, which can lead to costly repairs. Remember, a gentle hand can save you a lot of trouble down the road.Follow the actual plug’s lubricant instructions
Ask the installer to record whether the procedure requires a dry thread or a specified treatment. A special instruction for one component of one plug is not permission to coat the threads of another design. Do not combine a torque specification intended for one condition with an improvised lubricant. Clear documentation prevents that mismatch at the next service.
Anti-seize compounds are your secret weapon against stuck spark plugs. Applying a small amount to the spark plug threads can make future removal much easier. It acts as a lubricant, reducing friction between the plug and the aluminum head. Be cautious not to use too much anti-seize. Excessive application can lead to inaccurate torque readings, causing potential over-tightening. A little goes a long way, ensuring smooth removal next time you change your spark plugs. What other preventive measures have you found effective in maintaining your vehicle? By taking these steps, you can enjoy a hassle-free experience the next time you need to replace your spark plugs.Questions to settle before accepting the repair
Request confirmation that the old plug and fragments were accounted for, the chamber was checked as appropriate, and the repaired bore accepts the correct plug normally. Ask whether the engine was checked for leakage, misfire or another fault after reassembly. Keep the written invoice and repair warranty terms. If the original plug showed abnormal deposits, clarify whether their cause was diagnosed or merely observed. Replacing a damaged plug hole does not automatically correct an oil-consumption or fueling problem. The completed job should state both what was repaired and which unrelated findings still need attention.
Missing fragments require investigation
Compare the removed parts with the complete plug construction before considering the engine ready to turn. If a piece cannot be found, ask what inspection establishes whether it remains in the chamber. A quiet engine afterward would not be a reliable substitute for accounting for it beforehand. Keep photographs or the recovered pieces with the repair record where practical.
If you notice any signs of severe damage, it’s time to seek professional help immediately. Stripped threads or visible cracks around the spark plug area indicate that the situation might be beyond a simple DIY fix. Ignoring these signs can lead to more extensive engine damage, turning a minor repair into a major expense.Seat or casting damage may limit repair options
The threads hold the plug, but the seat must also perform its specified sealing role. Ask whether damage affects only the thread path or extends into the seat or surrounding casting. A repair that restores thread engagement without correcting the sealing problem is incomplete. Further machining or replacement may be necessary depending on the inspection and approved limits.
Consider reaching out to a professional in complex situations where multiple spark plugs are stuck or if the engine design makes access particularly difficult. Specialized tools and expertise can save you time and prevent further damage. An experienced mechanic can also provide insights into why the plugs got stuck in the first place, helping you avoid similar issues in the future.Separate inspection, extraction and repair costs
Request a staged estimate that identifies the initial inspection, proposed extraction and any conditional head repair. Agree on an authorization point before the shop moves into a more extensive operation. Ask which seals, fasteners, fluids and follow-up checks would be included if the head must come off. This makes an uncertain repair financially reviewable without demanding a false fixed outcome.
You might wonder if hiring a professional is worth the cost. Weigh the potential costs of DIY mistakes against the professional fees. While it might seem cheaper to handle it yourself, damaging the aluminum head could lead to costly repairs far exceeding the initial professional service fee. Have you ever been in a situation where a DIY fix turned into a more significant problem? Considering these factors can help you decide whether to tackle the issue yourself or seek a professional’s expertise.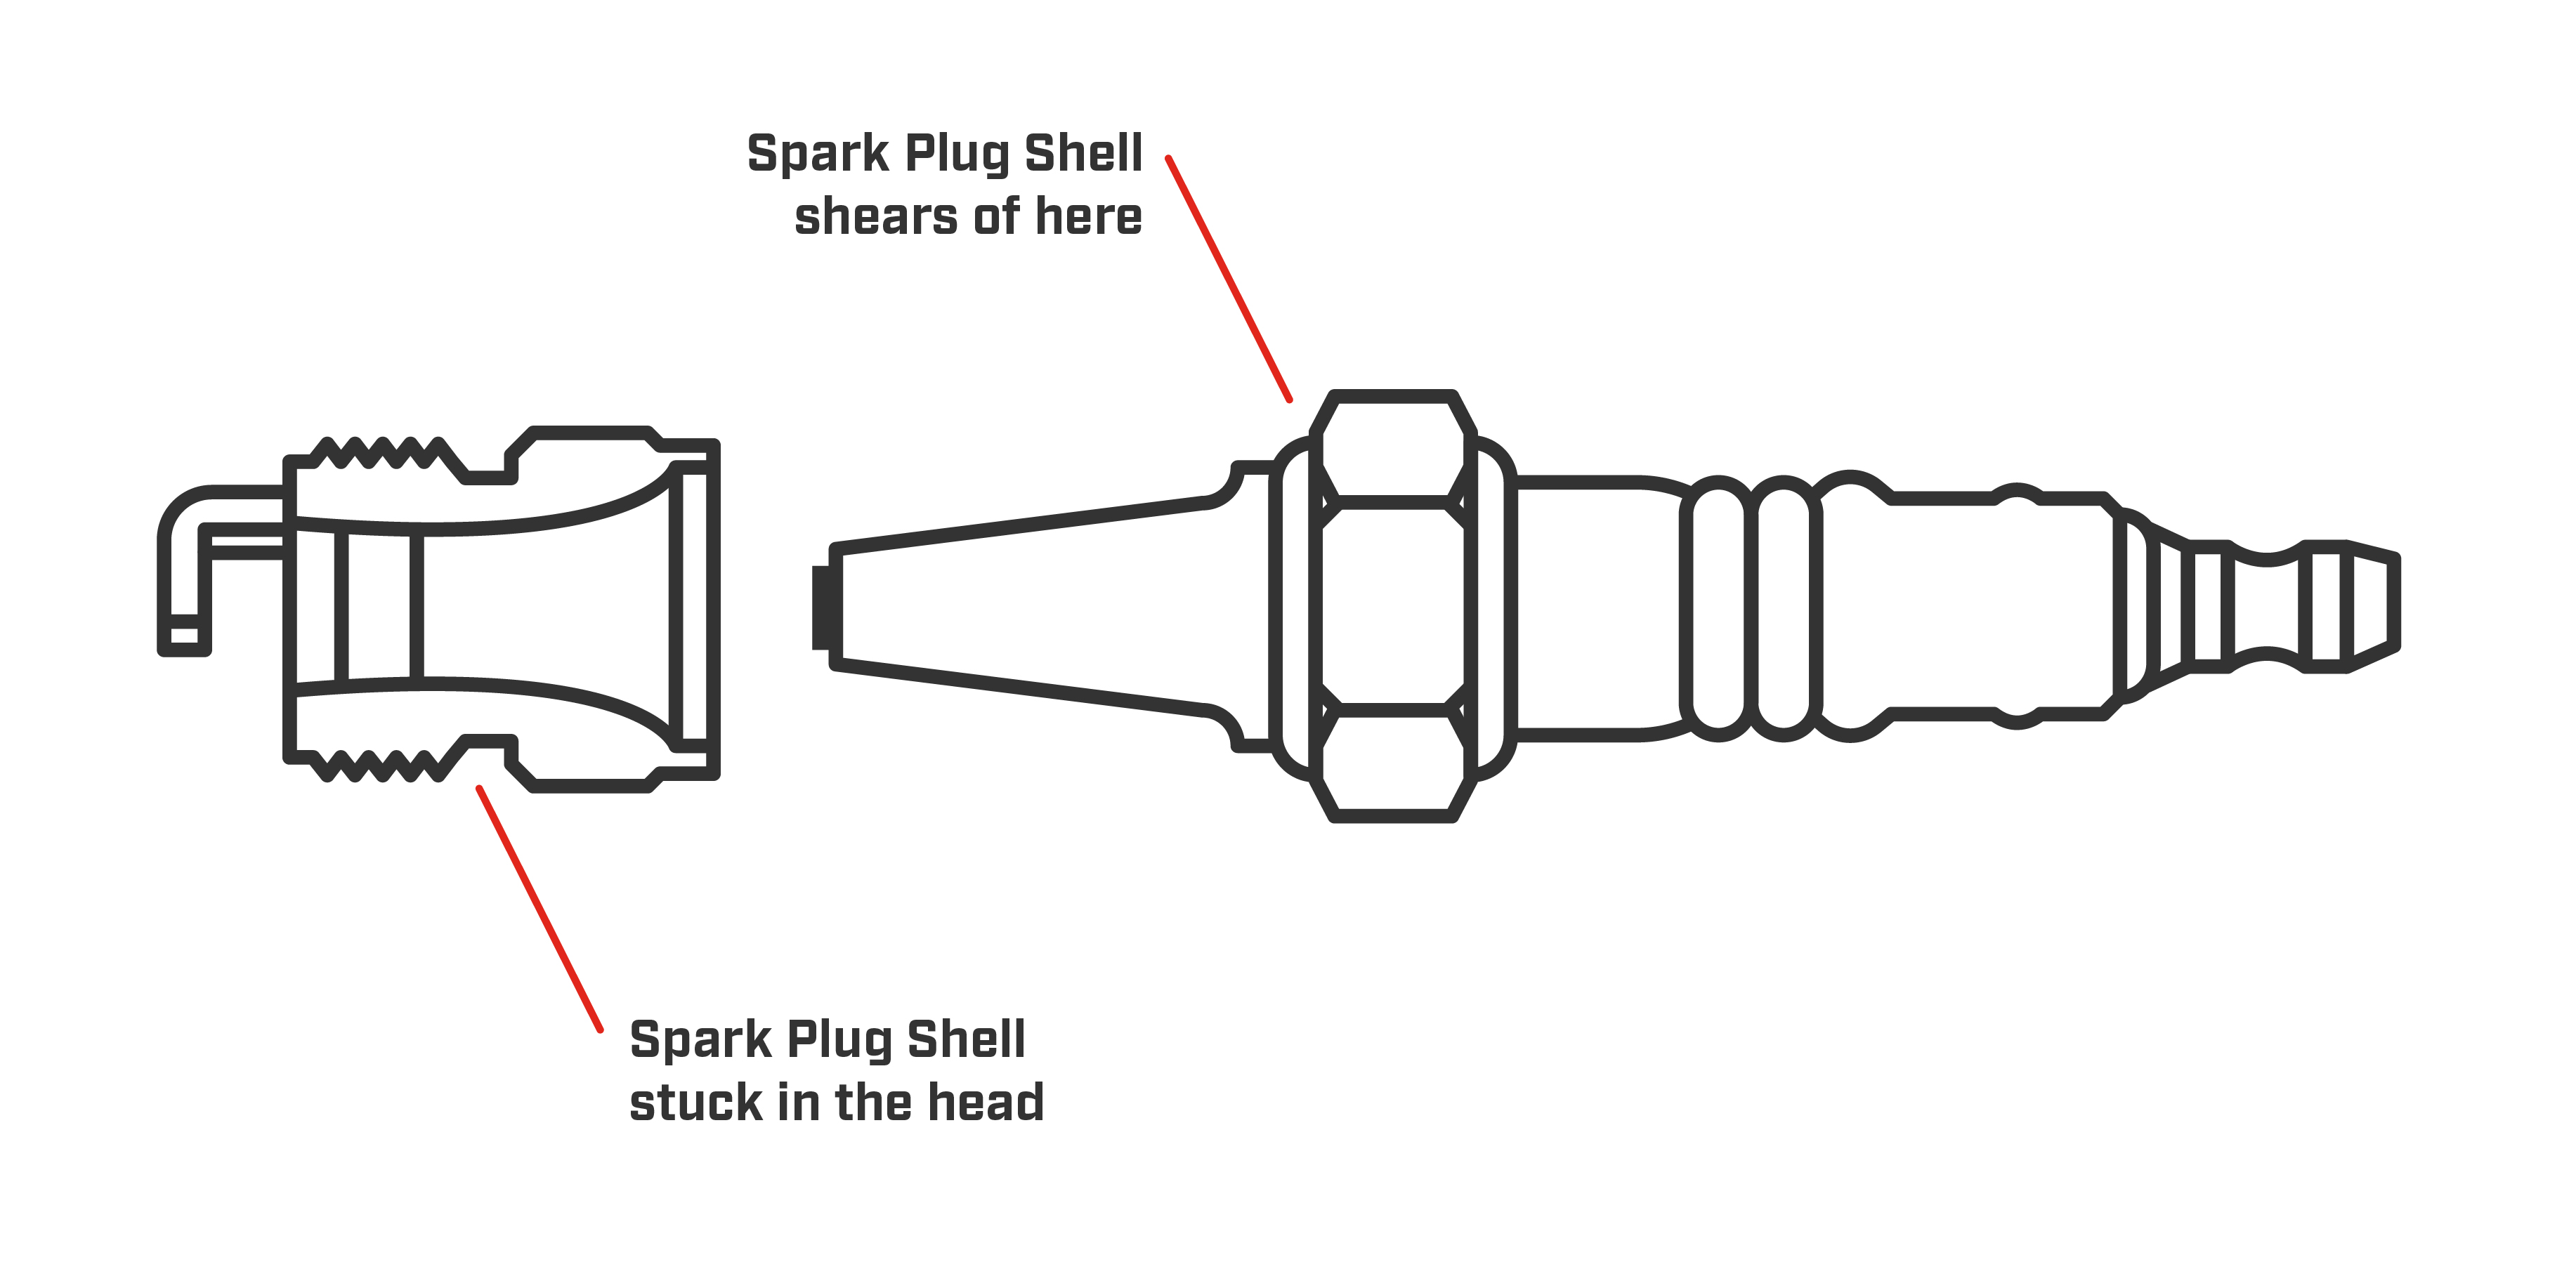
Credit: www.championautoparts.com
Preserve the head, not just the old plug
Successful removal from an aluminum head means a serviceable sealing joint and a clean, accounted-for chamber afterward. It is reasonable to stop before breakage when that outcome cannot be controlled with the available tools.
For earlier-stage checks, see how to assess initial loosening resistance. For the overall sequence, see stuck spark plug removal planning.
The distinctive decision here is whether the head itself remains sound and how any damage will be verified and repaired. Let inspection evidence determine that decision instead of assuming every stubborn plug needs either more force or a replacement cylinder head.


Automotive reference information. Confirm specifications in the manual for your exact vehicle. Original replacement guides link to their research sources. About us


