
You can tighten a ball joint's mounting fasteners according to the vehicle and part instructions, but that does not normally tighten the ball inside a worn suspension joint. Those are different interfaces. A loose stud nut, loose housing attachment and internal socket wear can all be described as a loose ball joint, yet they require different inspections and repair decisions. Identify exactly where movement occurs before reaching for a larger wrench.
If a suspension connection is loose, damaged or suspected of separating, keep the vehicle out of use until it is assessed. A noise alone does not identify the failed component, and tightening random fasteners is not a reliable diagnosis. This guide concerns automotive suspension ball joints, not the adjustable pivot in a rear-view mirror. It explains how to evaluate a proposed tightening repair without inventing a torque specification for every vehicle or treating internal wear as an adjustment problem.
Credit: www.moogparts.com
Identify the connection that is actually loose
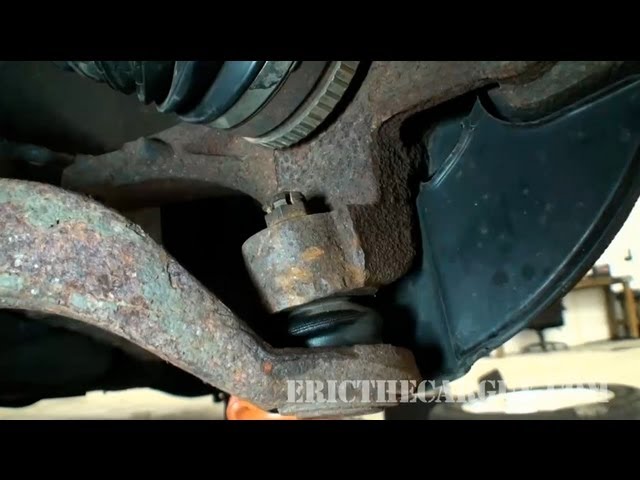
A suspension ball joint has a moving ball-and-socket interface that permits the required angular motion. Its housing attaches to another suspension part, and its stud connects to the knuckle or another specified component. A mounting fastener secures an external connection; it does not generally provide a service adjustment for internal bearing clearance. Delphi’s ball-joint service guidance describes wear within the socket and the need for appropriate replacement. More torque on the stud nut cannot restore material lost inside that bearing. Ask the inspector to identify movement between specific parts. Is the stud moving relative to the hole in the knuckle, the housing moving in the control arm, or the stud moving excessively inside its housing? A useful finding names the interface and the inspection method. A vague statement that the wheel has play leaves open other causes, including bearing or steering-linkage issues.
Our ball-joint symptom and inspection guide explains why symptoms need confirmation before parts are selected. Inspection also depends on suspension design and loading. Do not assume that any movement seen while a wheel is hanging is measured under the manufacturer's required condition. Obtain the prescribed support arrangement, test direction and allowable movement criterion. Do not place hands into a moving pinch point or work under a vehicle supported only by a jack. If the procedure requires a load condition or measuring tool you cannot provide, have a suitably equipped workshop perform the assessment. External looseness can damage the connection that was supposed to be clamped. Simply restoring nut torque may therefore be insufficient.
MOOG’s stud-nut technical bulletin requires attention to stud fit and damage in the receiving taper, with replacement of a damaged knuckle where indicated. This is especially important when a stud has been moving during use. The repair decision must account for what the movement did to the mating surfaces, not only why the nut became loose. The original installation should also be identified. A replacement joint may use supplied hardware that differs from the removed hardware. Previous work may have mixed components or left out a locking feature. A nut that looks familiar is not proof that it is correct. Record the part number and compare the installation instructions before deciding that an additional turn will finish the repair.
Use the correct specification, not a universal tightness
There is no single ball-joint torque that applies to every stud nut, pinch bolt, bracket bolt and housing-retention arrangement. The correct value belongs to a particular fastener in a particular application, with specified preparation and sometimes a sequence or angle step. Identify the fastening type before looking up the number. A general suspension torque chart or a value from a similar model can miss a different joint design or hardware revision. Read the vehicle procedure together with the replacement manufacturer's instructions. Resolve any apparent conflict before installation rather than averaging the values.
Confirm the units and whether the instruction applies to new hardware, dry threads or a specified treatment. Do not add oil, anti-seize or threadlocker just because it seems protective. Changing the specified condition can change the relationship between applied torque and the assembled connection. Product-specific instructions matter more than a preference developed on another repair. Use suitable torque equipment in the required range and configuration. An impact wrench's setting, the sound of its hammering or the amount of resistance felt on a long handle is not a measured final torque.
A torque wrench also cannot certify a damaged interface simply because it clicks. If the nut is binding, the stud is spinning or the connection is seating incorrectly, stop and resolve that condition before interpreting a reading as success. Overtightening can damage the fastener or receiving component; extra force is not extra security. A nut that reaches an unusual position, damaged threads or visible distortion should prompt a fitment review. Do not keep tightening to hide an incorrectly seated taper. Likewise, do not add washers to move a locking feature into a more convenient position unless the instructions specify them.
A mismatch should be diagnosed rather than disguised by altered hardware. Some suspension fasteners have a required loaded position for final tightening, particularly where other components have been disturbed. Follow the actual procedure for each connection instead of translating that into a rule to put the entire vehicle's weight on every ball joint during assembly. Support points and load control are part of the method. The safe condition for one suspension layout may be unsuitable for another.
Plan a proper hardware repair or replacement installation
Begin by determining whether the existing parts remain serviceable. If a mounting connection was loose during use, inspect the relevant mating faces, threads and retention arrangement as required. Do not assume the old hardware can be reused merely because it can still be turned. A replacement joint also needs correct fitment, orientation and associated components.
Tightening is one stage of installation, not a substitute for those checks. Check the supplied fasteners carefully. MOOG’s replacement-fastener guidance explains why its supplied hardware can be essential to the intended connection, including applications with inserts in an aluminium knuckle. Differences in flange size or nut style may be functional rather than cosmetic.
-
Do not substitute the old nut simply because its wrench size is more convenient. If the kit contents conflict with the application or instructions, stop and confirm the correct parts with the supplier. For a tapered-stud connection, the fit must be correct before final fastening. The nut must not be used to pull an incorrect or damaged taper into apparent compatibility.
- Follow the specified cleaning and seating requirements and check for rocking or damage. If the stud turns with the nut, do not treat that as permission to grip the polished surface with pliers. Our spinning ball-joint stud guide covers that distinct installation problem and the need for approved holding or seating methods. For a pinch-bolt or other non-tapered arrangement, use that design's installation procedure.
- Do not import the tapered-stud advice simply because both parts are called ball joints. Stud positioning, groove alignment, bolt identity and retention can be critical. A fastener entering a hole does not by itself establish correct engagement. Keep the exact assembly drawing or instructions available while checking the connection.
-
Press-in housing installation is another separate operation. A housing loose in its mounting bore is not repaired by tightening the stud nut. MOOG’s elliptical-joint installation guidance also shows that some press-in designs require specific orientation. Do not hammer or rotate an installed housing to create an improvised fit.
- Determine whether the control arm, joint or both require replacement under the applicable criteria. Adhesive or staking is not a universal substitute for the designed interference and retention. Once the correct connection is assembled, complete its specified locking arrangement.
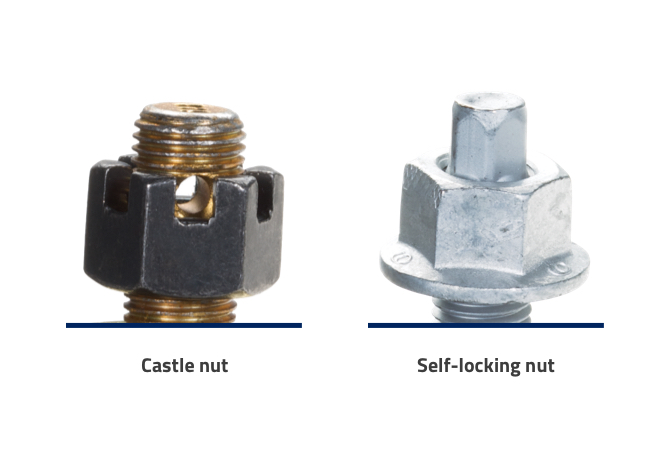
- A self-locking nut and a castellated nut with a cotter pin are different systems. Use the required new hardware and follow the stated alignment process. Do not back off a correctly torqued nut simply to make a pin hole convenient where the procedure prohibits doing so.
-
Do not assume the cotter pin supplies the clamping force that the nut should provide. Protect the dust boot during installation and check its seating afterward. A tool mark or torn boot should not be hidden by moving it out of view.
If the joint is serviceable with grease, follow the product's lubrication requirements; if it is sealed, do not improvise a grease fitting. Lubrication does not erase internal wear. Complete any further checks or alignment work required by the vehicle and by the components disturbed during the repair.
Decide whether the finished work addresses the original fault
The final question is whether the diagnosed defect has actually been corrected. A properly fastened new joint should have the required fit, protection and retention, while surrounding parts remain correctly routed and secured.
Verify the inspection criteria relevant to the original complaint. Do not rely solely on the disappearance of a clunk during a short drive.
Noise can vary with temperature, load and road surface even when a connection remains unsafe. Before any road test, complete the prescribed stationary inspection and wheel-fastening checks.
If movement remains unexplained, hardware will not seat correctly or a locking feature cannot be installed as specified, keep the vehicle out of service. A road test is not an acceptable way to settle uncertainty about a loose suspension connection.
Arrange recovery if necessary rather than relying on a temporary tightening to reach a workshop. Ask for a clear record of the repair.
It should distinguish internal joint replacement from correction of a mounting fault and identify any damaged receiving component. Retain the part information and relevant tightening specification used.
If the same symptom returns, that record helps identify whether the original diagnosis was incomplete or a different component is involved. Repeated retightening without explaining the cause is not a maintenance strategy.
There is no general interval at which every driver should tighten suspension ball-joint nuts. Follow prescribed inspections and any specific follow-up instructions associated with the repair.
A worn joint needs the supported replacement path, and a loose mounting connection needs an investigation of fit, hardware and damage. Keeping those decisions separate prevents the misleading promise that a wrench can adjust every kind of ball-joint looseness.


Automotive reference information. Confirm specifications in the manual for your exact vehicle. Original replacement guides link to their research sources. About us