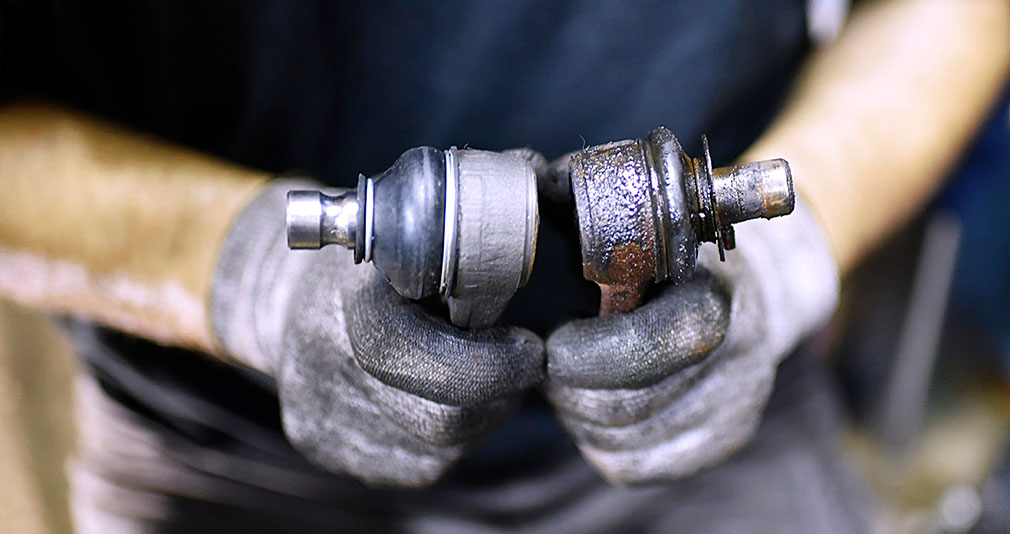

Ball joints can deteriorate through wear at their moving bearing surfaces, contamination after protective damage, inappropriate lubrication or damage associated with installation and mounting. The route to failure varies with the joint design, its operating conditions and the condition of the surrounding suspension. Age or mileage alone does not establish which mechanism affected a particular part. A premature failure deserves inspection of both the joint and the assembly that retains it. The useful question is not simply whether ball joints wear out, but what evidence explains the condition found.
A torn boot, an insecure mounting and excessive internal movement describe different findings. They can occur together, yet one should not automatically be treated as proof of another. This guide explains those distinctions and the maintenance implications. If a suspension connection is confirmed unsafe, keep the vehicle out of use and arrange repair or suitable recovery rather than testing how long it will last.
Trace the cause from protection, loading and installation
A ball joint permits the suspension's required angular movement while connecting its components. Its moving interface is designed to operate with the intended lubrication and protection. Over time, wear can change its condition, but the rate is not a universal clock. MOOG’s ball-joint overview identifies the protective boot and contamination as important factors. That supports inspecting how the joint has been protected; it does not support predicting a fixed remaining distance from the vehicle's odometer. The boot helps keep unwanted material away from the moving joint.
A split, displaced or damaged boot can compromise that protection. Water and road debris entering an exposed area can contribute to deterioration. However, an exterior photograph cannot establish precisely how much contamination entered or how far wear has progressed. A technician should assess the joint under its applicable criteria and determine whether a supported boot repair or component replacement is required. Do not assume an apparently small opening is harmless because the vehicle remains quiet. Boot damage can have different origins.
- It may develop during service, through contact with an adjacent part or through deterioration in use. If a new joint's boot is damaged soon after installation, inspect its seating and surrounding clearance as well as the material itself. Simply fitting another joint without addressing unwanted contact may repeat the problem. Preserve useful photographs before cleaning or dismantling so the path of damage is easier to understand. A mark made during removal should not later be described as evidence of the original failure. Lubrication requirements depend on the actual part.
- Some joints are sealed, while others have a service fitting and a defined maintenance requirement. MOOG’s guidance for greaseable steering and suspension parts describes maintenance for its covered products. Follow the instructions for the fitted joint rather than transferring a brand-wide interval to every vehicle. A serviceable fitting does not justify an arbitrary grease type or quantity. A sealed design should not be punctured or modified to imitate a greaseable one.
-
Missed required lubrication can be relevant to a failure investigation, but the absence of a service invoice is not by itself proof of the physical cause. Identify what the component required, what work is documented and what inspection shows. Conversely, recent greasing does not prove an already worn joint is sound. Lubricant can support a serviceable interface; it cannot replace material lost through wear or correct an insecure housing. Keep maintenance history and condition assessment as separate parts of the explanation.
- Excessive or unsuitable servicing can also create problems. Do not pump grease indefinitely because a noise remains, and do not inject oil under a boot as an experiment. Follow the joint manufacturer's instructions for the fitting, lubricant and stopping condition. A damaged protective part or incompatible material may introduce a new concern while briefly changing the sound. A quieter joint after treatment has not automatically passed inspection.
- Our squeaking-joint guide addresses the separate question of finding the source of a noise. Installation is another possible contributor. The correct part can still be damaged by an unsuitable press adapter, incorrect orientation or excessive fastening. A housing and its moving stud do not accept force in every direction. If a joint failed shortly after replacement, inspect the receiving component and installation history instead of assuming either a defective product or poor workmanship without evidence.
-
The relevant question is what was damaged and how the findings relate to the specified method. The mounting can fail even when the internal bearing is not the original problem. MOOG’s stud-fit bulletin explains that an unsuitable or damaged receiving taper can compromise the connection. A new joint cannot restore the geometry of a worn knuckle opening. A stud nut tightened again may conceal movement temporarily without correcting the receiving surface.
- Distinguish internal play from movement between the stud and knuckle or between the housing and arm. Each interface requires its own inspection and repair decision. Incorrect replacement selection can produce another failure path. Confirm the vehicle, joint position and catalogue qualifiers, especially where the suspension has been modified. A similar-looking stud or housing is not proof of compatibility.
- The wrong part may appear to assemble while failing to meet the intended fit or movement requirements. Retain the exact part number and instructions after repair so a later assessment can verify what was installed. A vague record saying front ball joint replaced leaves important information missing. Suspension modifications deserve a specific compatibility review. A change in ride height, control arms or travel limits can alter the conditions under which the joint operates.
-
That does not prove that every modification damages joints, nor does it prove that an advertised small lift is always harmless. Compare the actual combination with the component and kit requirements. Our levelling-kit compatibility guide explains why geometry and documented limits matter more than a blanket verdict about modified vehicles. Road impacts and demanding use should be described accurately during diagnosis. Report a curb strike, collision or other event that preceded a change in steering or noise.
- Do not assume the joint is the only affected part. The arm, knuckle, wheel and related components may need inspection under the repairer's assessment. An impact history can help explain a defect, but it should not replace evidence of what is actually damaged. Replacing the most visible joint while leaving a bent or insecure surrounding part can leave the complaint unresolved. Corrosion and environmental exposure can complicate the picture.
Exterior rust on an assembly does not automatically establish internal joint failure, while a clean painted housing does not prove the bearing or mounting is healthy. Identify where corrosion occurs and whether it affects a functional surface or protection. Cleaning may make inspection possible, but aggressive abrasion can erase evidence or damage the component. The inspection should distinguish cosmetic appearance from a condition that violates the relevant service criteria. Symptoms are clues rather than a reliable ranking of failure causes.
Clunks, squeaks, steering changes and unusual tyre wear can originate elsewhere. Some defective joints may not produce the noise a driver expects. MOOG’s inspection bulletin shows why different designs require different inspection conditions and warns against misleading conclusions from an inappropriate method. Do not use one generic wheel-shake test or a photograph of another design as the sole basis for declaring every joint good or bad. A useful workshop finding names the location, design, test condition and result.

Credit: www.moogparts.com
Ask whether the technician found internal wear, damaged protection, an insecure mounting or another issue. If movement was measured, ask which procedure and limit apply. If the joint was removed for inspection, retain the findings and photographs where practical. A diagnosis that says only worn because old explains little about a repeat failure or the condition of surrounding parts. Evidence should guide the repair scope.
When a recently installed joint fails, preserve the part and records if a supplier may inspect it. Include purchase and installation dates, mileage, lubricant information where relevant and details of modifications. Do not clean away all evidence or discard the failed component before understanding the claim requirements. A warranty decision and a technical cause assessment are related but different processes. Coverage does not establish that the vehicle is safe to drive while paperwork is pending.
Preventive care begins with the actual vehicle and part requirements. Inspect boots and mounting condition during prescribed service, perform required lubrication on serviceable designs and address new steering or suspension symptoms promptly. Avoid inventing a universal replacement interval or assuming the opposite side has identical wear. Its condition should be assessed separately. A preventive replacement recommendation should be distinguished from a confirmed failure so the owner understands why each part is proposed.
The final repair should address the initiating defect and any resulting damage. If the original problem was an unsuitable mounting, renewing only the joint may be incomplete. If the joint is worn internally, tightening its mounting hardware is not a bearing adjustment. If protection was damaged by contact, correct the contact as well as the affected component. A clear cause-based explanation helps prevent recurrence without promising that every future suspension problem has been eliminated.


Automotive reference information. Confirm specifications in the manual for your exact vehicle. Original replacement guides link to their research sources. About us


