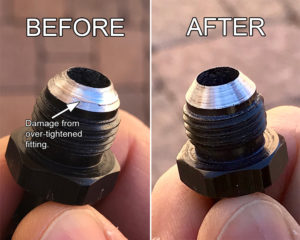

A typical automotive brake-tube flare seals where its formed end meets the matching seat. The threaded nut supplies the force that holds those surfaces together. Thread tape, external glue or a coating spread over the outside does not repair a damaged flare, mismatched seat or corroded tube. If a connection leaks brake fluid, the vehicle needs a proper diagnosis and repair before it is driven. Adding fluid to compensate for a leak is not a safe operating plan.
The question how to seal brake lines can describe several different jobs. A leaking rigid-tube connection is not the same assembly as a flexible hose attached with a banjo bolt and specified sealing washers. A damaged tube wall is different again: tightening a nearby nut cannot fix it. Identify the exact place where fluid emerges, the connection design and the affected component before deciding what parts or tools are needed. AGS explains that a flare nut clamps the formed tube end against its seat.
Its fitting guidance also emphasizes matching the complete connection, rather than judging compatibility by nominal tube size alone. A nut starting into a port does not prove the flare is right. Similar-looking automotive fittings can have different thread pitches, seats or intended applications. Forcing them together can turn a parts-selection problem into damage to an expensive hydraulic component. This article is a decision guide, not a substitute for a model-specific hydraulic repair procedure.
It explains what must be correct for a seal and what evidence a finished repair should provide. It does not supply a universal tightening torque, authorize a substitute fitting or recommend opening an energized brake system. Vehicles with powered braking functions require their own precautions before any hydraulic service. When requesting help, describe the connection location rather than saying only the brake line leaks.
A photograph taken without crawling beneath an unsupported vehicle can be useful, but a wet component is not always the source. Fluid may track along a tube or collect below another connection. The technician should establish the origin before ordering parts. For damage away from a fitting, the related guide to brake-line leak repair decisions addresses the different replacement question.

Credit: www.reddit.com
Identify the assembly before buying repair materials
- Bring the full vehicle identification and a precise description of the connection to the supplier or repairer. Identify whether the defect is at a tube-to-component seat, a tube union, a hose end or the tube wall. The replacement list follows that diagnosis. Buying sealant first assumes the answer before the sealing design is known. If the original fitting is damaged, its appearance alone may not be a dependable reference for selecting a substitute. Use service information and documented part specifications to confirm the required assembly.
Credit: www.quora.com
Questions that should be answered before assembly
- Which part has actually failed? Which surface forms the seal?
- Is the replacement specified for this vehicle and location? Does the tube end match the receiving seat?
- Are both threads correctly identified? Is the adjacent tubing serviceable?
- Does the proposed repair method follow the applicable instructions? Are required supports available?
- Can the line follow its intended route without strain?
- What bleeding procedure is required afterward?
- Which checks will establish that the original leak is resolved?
- These questions organize the work without supplying an unsafe universal tightening sequence.
| The technician should resolve them before the vehicle returns to service. |
Why a connection continues to leak
- A seal can fail because its surfaces are wrong, damaged or not brought together as intended. A flare with a crack, an uneven shape, contamination at the seat, a damaged port or incorrect alignment needs investigation. More tightening is not a universal cure. Excessive force can distort a connection or damage threads without correcting the original mismatch. A fitting that repeatedly leaks after tightening should be reassessed, not simply tightened until something yields. Alignment matters before the nut is secured. The connection should not be used as a winch to pull a badly routed tube into position.
- A tube under unnecessary strain may place a continuing load on the joint. Correct routing and support are part of the repair even though they do not appear on the sealing face. A leak-free connection achieved with the line rubbing another component is not an acceptable finished installation. Different end forms are not interchangeable because they seem close in size. The relevant comparison includes tube diameter, flare geometry, nut thread and the seat in the component. The AGS fitted-line catalog distinguishes pre-flared products by these specifications.
- A prepared line can avoid making new ends, but it still requires the correct application, routing and final verification. Choosing a longer line and coiling excess tubing arbitrarily is not a substitute for planning its route. A wet banjo connection needs its own assessment. The specified bolt, hose end, mating surfaces and sealing washers must match the design. Do not transfer a torque or washer-reuse rule from a different caliper. An externally similar hose may have a different orientation or stop arrangement.
- If the defect is in a hose crimp or its body, treating the area with sealant does not restore a manufactured hose assembly. Rust around a fitting also changes the decision. A tube can be weakened close to the nut even when the threaded component looks serviceable. Disturbing an old connection can reveal a larger corroded area. The workshop should inspect adjacent tubing and decide whether a localized repair is allowed and sensible. A quote should leave room for that evidence without pretending every rusty connection requires the same length of replacement line.
Practical questions about sealing brake connections
Which tools and information does the repair require?
The essential starting tool is accurate service information. It identifies the connection, replacement restrictions, tightening method and bleeding requirements for the vehicle. Measurement and identification tools may be needed to confirm tube and thread dimensions; a rough visual comparison is not enough. Suitable line tools must engage the fitting without damaging the surrounding tube. If a new end must be formed, the flaring equipment has to support the specified tubing and end form. A competent repair also needs a way to support the vehicle safely, protect open hydraulic passages from contamination and collect fluid responsibly. Those requirements are independent of whether the fitting is easy to reach. A flare wrench in the correct size does not supply the missing training or service procedure. If access requires removing major components, that access work belongs in the estimate too. Ask the technician whether the proposed part is a vehicle-specific assembly or a line made for the repair. Either answer needs documented compatibility. The invoice should identify the installed component or material and connection type. A general statement that a fitting is high pressure does not prove it is intended for an automotive braking circuit. Avoid selecting industrial plumbing parts simply because their advertised pressure number is large.
Is this an appropriate repair to attempt at home?
The decisive question is whether you can identify the system and complete its approved repair and validation process, not whether you can make a nut turn. An unknown leak, severely corroded tubing, damaged component threads or an unfamiliar electronic braking system is a reason to use a qualified repairer. Do not learn the connection type by repeatedly trying fittings in the vehicle. That can damage the seat you are trying to preserve. Keep the car out of service while a hydraulic leak is unresolved. A temporary wrap or adhesive may hide visible wetness without restoring the pressure boundary. Clamping off a leaking branch removes braking capability and is not a way to make the vehicle roadworthy. Arrange transport appropriate to its condition instead. The existence of another hydraulic circuit does not authorize driving with a known failed one. If you are comparing estimates, ask each shop to explain the same scope: the failed part, adjacent-line inspection, required access, fluid and bleeding, and verification. Differences then become understandable. One estimate might cover only a fitting while another includes a deteriorated section and the labor to route it correctly. Choosing solely by the smallest parts price can miss what the repair actually requires.
What proves the connection is sealed?
A dry exterior immediately after assembly is only one observation. The technician must check the repair under the conditions required by the vehicle procedure and confirm that the hydraulic system functions properly. Residual fluid from the repair should not be confused with a fresh leak. Equally, an absorbent wrap left around a fitting can conceal a continuing problem and is not a seal test. Normal-looking reservoir level does not prove that all air has been removed. A firm pedal on one brief application is not a complete functional inspection either. Bleeding, leak inspection and brake-operation checks answer different questions. All of the relevant checks belong in the release decision. A road test, where appropriate after stationary checks, is a professional final verification rather than an owner experiment with an unresolved leak. Ask what was checked and whether any limitation remains. If a warning persists or pedal behavior remains abnormal, the repair is not complete merely because the original joint is dry. The new symptom must be addressed before the vehicle returns to normal use. Keep the invoice and report any recurrence promptly, including when it occurs and whether the fluid level has changed.
What does a complete sealing repair involve?
The overall process is identification, fault confirmation, correct component selection, approved assembly and verification. It is not a generic sequence of adding sealant and tightening. A technician should first determine whether the fault lies in the tube end, nut, component seat, hose assembly or another nearby part. That finding determines whether reassembly is appropriate or replacement is required. During replacement, the line needs its proper supports and clearance from moving or hot components. The assembly must not be twisted to make an unsuitable part reach. Connections that look correct when the suspension hangs may need inspection in the positions specified by the vehicle procedure. The hydraulic circuit then needs the correct fluid and bleeding process, including any required service functions. A useful final explanation is specific: which sealing surface or part failed, what was installed, and how the repair was checked. It should not claim that sealant made a damaged pressure component safe. If the concern began with a newly fabricated end, compare the requirements for the correct brake-tube flare with the actual port rather than assuming every application uses the same form. A reliable seal comes from compatible, undamaged components assembled correctly, followed by checks of the whole affected circuit.


Automotive reference information. Confirm specifications in the manual for your exact vehicle. Original replacement guides link to their research sources. About us


